Showing posts with label Kid Friendly Crafts. Show all posts

Monday, October 23, 2017

Kids Play - Paper Pumpkins

If you are like me, you spend a lot of time in October making up ideas for decorating that month, whether you get them executed or not.  Here is a very simple project I did with my 7 yr old daughter that would work for October or November (in case you get behind) and uses supplies most crafters will have on hand.


First, punch out 6 circles. Mine were 2 1/4".  Cut a sliver off the bottom of each so they will sit flat once assembled.  Fold each circle in half.  Add sticky adhesive to each side (I recommend Tear and Tape) and hook each side together.  Slide a small piece of brown cardstock down the hole in the middle.  We used a pipecleaner because I had scraps but you can even use a real stick for the stem!  Punch out a leaf using our leaf punch and slide down the hole as well and bend at a slight angle.  Voila!


Supplies:
  • Cardstock: Pumpkin Pie, Old Olive
  • Ink: None
  • Stamp Set: None
  • Accessories: Leaf Punch, Circle Punch, Tear and Tape Adhesive, Scissors, Pipe cleaner

These would make good place holders for Thanksgiving too with the names on the stem....


From October 1st - October 31st, you can purchase three packs of designer paper included in the promotion and get a fourth for free!  Check out my Web site for images of all the included papers!

Catalog
Item
Description
Price
Annual (p. 189)
144180
$13.00 USD
Annual (p. 189)
144137
$11.00 USD
Annual (p. 189)
144118
$11.00 USD
Annual (p. 188)
144111
$11.00 USD
Annual (p. 188)
144163
$11.00 USD
Annual (p. 188)
144155
$11.00 USD
Annual (p. 188)
144185
$11.00 USD
Annual (p. 188)
144110
$11.00 USD
Annual (p. 187)
144168
$10.00 USD
Annual (p. 187)
144193
$10.00 USD
Annual (p. 187)
144177
$10.00 USD
Holiday (p. 29)
144629
$11.00 USD
Holiday (p. 49)
144613
$11.00 USD


If you place an order of $300 or have a party that totals $300 between September 1st and October 31st, you can earn this exclusive Merry Patterns photopolymer stamp set for free! This set is great for tags and cards and more to bring in the holidays.  Contact me today if you are interested in earning it.


The best Paper Pumpkin kits of the year come during the holidays, in my opinion!  This year, Stampin' Up! is trying something new and giving us TWO months of holiday kits in October and November and they will coordinate.  If you didn't order by October 10th, you won't be able to get the first kit at your door but you can still subscribe by November 10th to get the second one.  These kits will help you get your card and gift making started off right!  

Paper Pumpkin is creativity in a box.  It costs $19.95 plus tax and ships to your mailbox once a month.  It contains everything you need for your own creative escape.  Besides the instructions and pieces for the cards or project, it also contains ink and photopolymer stamps and usually the adhesive you need as well.  My subscribers will also get a project sheet with tips and additional ideas and instructions that they can make with the supplies in the kits and sometimes some supplemental supplies.  Plus I try to send one of the alternative ideas out to everyone in the mail so you get two fun surprises in the mail each month!  Sign up by the 10th of the month to get that month's kit! 

There are two ways to sign up.  
October's Pining for Plaid kits will go on sale today at 2pm MST so get them while supplies last! 

Subscribers can also have access to all my past project sheets!


To purchase these products, please visit my Online Store and use hostess code 7NCUYJZ4 when checking out through October 31st.

JOIN MY TEAM


Joining Stampin' Up! was one of the best decisions I've made in life.  I have met some wonderful people who offer incredible inspiration and I believe in the quality of the product. Plus there is always something special about making and receiving homemade cards or décor from people.

If you are interested in joining my team, contact me today or go here to sign up!  You can get $125 in free merchandise that you choose yourself for only $99 plus tax.  With the new 2017-2018 Annual Catalog and Holiday Catalog, it's not hard at all to find stamps and accessories that you will want to play with. 

Being a demonstrator doesn’t mean you have to have parties – it means you can buy from yourself at a discount!  And if you don’t hit your minimums, there is no penalty!  Contact me today if you are interested in trying this out or sign up directly at https://ida.stampinup.com/en/?demoid=80380.

Have a craftastic day,
Stacy

Thursday, March 27, 2014

Kid Friendly Crafting - Egg Carton Flowers

As I search for today's kid friendly craft to take to our play date, I thought I would post the craft Callie and I completed last week.  The project was inspired by this post found on Pinterest.

Step 1: Cut out all the cups from the paper egg carton.  Cut the sides into fours or eights depending on the size of the carton.  Bend down the edges carefully so they don't tear off.


Step 2: Put cling wrap around the other half of the egg carton and add your paint to it.  I recommend the Crayola Washable paints just for clean up purposes but I'm OCD that way!  :)  The plastic wrap keeps the paint from being sucked into the other half of the egg carton.


Step 3: Give your child the paint brush and the paint and let them go to town.  We used this craft to show how colors mix together to create other colors.

 
Step 4: Create a circle ring using cardboard.  Mine is about 12" in diameter but you can use any size you'd like.  A 12" ring will require about 15 cups. Paint and set aside. 

 
Step 5: Once painted, let everything dry.  Punch two holes to the top of the ring and thread a ribbon through it for hanging.  Use a hot glue gun to attach the individual flowers to the ring.

Step 6: Put Elmer's glue into the individual cups and pour in glitter, beads, buttons, or anything else shiny that the child enjoys! 


Callie is 3 1/2 years old and we came back to this project several times during the day.  She didn't have the attention span to do it all in one sitting.  But she has shown it off to everyone that has come to visit so she's very proud of it no matter how long it took!

Have a craftastic day,
Stacy

Thursday, December 5, 2013

25 Days of Christmas - Day 4 & 5

DAYS OF CHRISTMAS - DAYS 4 & 5

Yesterday we were so busy doing that I didn't get to typing!  Snoozle was found on the kitchen table hugging a candle since it's been so cold this week in Boise.  You'd think he'd be used to it due to the North Pole and all but I try not to judge.   We had our Wednesday Crafting Playdate and that project is described below.   Look at these cute photos of our little artists!


Callie opened her book, A Wish to be a Christmas Tree, all about a grandpa tree that is too big to be cut down and taken home.  I'm not sure she got the point of the story but it was a good one. 

Today we will be painting a snowman that was purchased at a craft store and wrapping it with a fabric scarf once my AMAZING goodie bag gets here from Stampin' Up!  For booking workshops in November and December, I am receiving a gift bag with $400 in free merchandise which includes a ton of great fabric..  WHAT????? :)  I'll post once done. 

HOLIDAY PROJECT : KID FRIENDLY SNOWMAN

Today's holiday project was directly inspired by a blog post from a fellow demonstrator who's blog I follow.  She is starting these mommy and me kits that I highly encourage you to attend if you live in her area!  I wish Callie and I did!  However, since we don't, I decided to try my version of it off her picture and it turned out pretty good if I do say so myself!

I've mentioned before that we try to do a crafting playdate with our friends on Wednesdays and we made these adorable snowmen yesterday.  The kids loved it.  They did all the cotton ball and glue work.  The mommies had to do the punches and the tying the knots since our kiddos are only 3.


Supplies:
Cardstock: Pumpkin Pie, Real Red, Old Olive, Basic Black
Accessories: Big Shot & Cutting Mats, Top Note Bigz Die, Sweet Buttons Embosslit Die, 1/2 Circle Punch, Oval Punch, Corner Rounder Punch, Paper Trimmer, Pop Dots (retired), 1/8 handheld punch, White Bakers Twine
Non-SU: White Paper Plates, Elmers Glue, Cotton Balls

Craftastic Notes:
  • To make the holly leaves, I punched out ovals and then used the 1/2 circle punch to punch around the oval to make the notches.
  • To make the nose, just take a piece of cardstock and cut it at an angle on one side.
  • To make the snowman, put glue on a separate plate and have your kiddos dip into it to put on the snowman plates.  Have them put the cotton balls on the back side of the plates so it will hang best.
  • To make the black elements on the snowman, start with an 8 1/2 x 5 1/2 piece of Basic Black.  Cut off a 1" strip from the 5 1/2 side and round the corners.  Use the rest of the piece to do the top note.  Then cut the scraps that are left to make your buttons and then your mouth pieces.
  • I recommend hooking the hat to the plate using pop dots since the glue didn't hold for us.

I hope you can make these with your kids.  We hung ours on the window using a small Command strip with a small hook.  As soon as we hung it up, it started to snow so now Callie thinks her snowman has a direct link to Mother Nature.....

Have a craftastic day,
Stacy

Sunday, November 24, 2013

Paper Leaf Wreaths

November Mystery Hostess Announcement
 
Thank you everyone that participated in my November Online party!  Callie drew names this morning and the lucky winner is….. BARB D!  Congrats to Barb!  The party reached the $300 level so that is $50 in free merchandise! 
 
The December code is ZFZTVF6C and I will draw on 12/20 for that one.  Remember that stamping supplies make great stocking stuffers and I also do gift cards that you can apply to online codes in the new year!
 
Today we are going to set up our Christmas tree and get out all my snowmen.  I'm so excited.  Funny how the craziest time of the year is the cleanest in my house since I get to pack up all my clutter in my boxes after I pull out the snowmen!
 
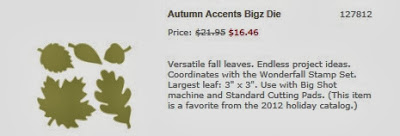
But with good comes bad.  I also have to rake leaves today once they thaw.  Yuck.  I love the Fall.  I love the changing leaves, the colors, and the crispness.  Unfortunately I don't love the cold rain that ruins said leaves before I can get them picked up for my projects.  Thank goodness we sell the Autumn Accents Sizzix Die so that I could use my favorite stamping tools to recreate this project since I could not use real leaves.
 
This week for our play-date craft, we broke out the glue, paper plates, scissors, and cardstock to create these fall wreathes with the kiddos.
 

Callie wasn't the most invested in this project.  She liked the glue stick but once the real glue had to come out, she was more interested in Sofia the First and her cars than her project.

 
However, Henry was all over this one.  He wanted as much glue and as many leaves as possible to the wreath and they had to be perfect.  It was adorable.  This little man is a crafter after my own heart!
 

Supplies:
  • Cardstock: Crushed Curry, Cajun Craze, Garden Green, Early Espresso, Birch Paper (from Thanksgiving Tablescape Simply Created Kit)
  • Accessories: Paper Snips, Elmer's Glue (non-SU), Paper Plates (non-SU), Big Shot & Cutting Mats, Autumn Accents Bigz Die
To make these wreaths, check out this post.

Have a craftastic day,
Stacy

Monday, November 11, 2013

Autumn Accents ABCs

By now you know that I really like doing crafting with Callie.  If there is a way for me to use it to help her learn the fundamentals, that's even better.  If you had told me when I joined Stampin' Up! that I would be doing this with my children, I would have called you crazy.  1 - Because I never thought I'd had children and 2 - My mind doesn't work this way.  I wouldn't even look at the kid sets in the catalog because I'd never use them....

However, I think that becoming a parent was my calling.  My mom and sister are smiling right now if they are reading this.  I was one of those adamant "Kids are not for me" people. I loved my selfish lifestyle and I couldn't imagine being responsible for another person in that way.  I remember my best friend telling me she was having a baby and thinking "Oh God, here we go!"  If she hadn't gotten pregnant with Mae, I don't think I would have been brave enough to consider changing everything by bringing a child into the world.  I am grateful for their decision giving me strength to make mine with Conlyn.  I would have had a part of me that searched for my whole life for that piece of me that was missing if I hadn't had Callie.  And without Callie, I wouldn't be having Michael either.

Anyhow, personal tangent over, and back to the project. 

The inspiration for this project came from this idea I found several clicks deep in Pinterest.  I didn't have Kraft paper big enough for a tree so I decided to just use the leaves portion.

We used some scraps of retired cardstock with the Big Shot and Autumn Accents Bigz Die.  Callie loves the Big Shot.  She likes turning the handle and separating all the pieces.  Once she ran all these through, I wrote the upper case letters on one set and lower case letters on the other.  Make sure you write on both sides so that you don't spend their tiny attention spans turning over letters!   I also marked the lower case ones with rhinestones so that they would be easy to sort if they got mixed up.


We've made several games with these.
  1. Sorting by color - Sort all the leaves by color and then practice counting them.
  2. Sorting by type - Sort all the leaves by shape and then practice counting them.
  3. Alphabetizing - Put all the upper case letters in alphabetical order. 
  4. Matching - Put all the corresponding lower case letters below the upper case letters.  This was the hardest for her but the most important as we start working on sounding our letters and recognizing words in her stories.
You could also do these with numbers and practice math skills.


Supplies:
  • Cardstock: Gumball Green, More Mustard (retired), Daffodil Delight, Certainly Celery (retired), Cherry Cobbler
  • Marker: Basic Black
  • Accessories: Big Shot & Cutting Mats, Autumn Accents Die, Basic Rhinestones
Remember that the Autumn Accents Bigz Die is part of the weekly deal that expires tonight at midnight! 

http://www.stampinup.com/ECWeb/ProductDetails.aspx?productID=127812&dbwsdemoid=80380

The hostess code for online orders for next month is G3SGBMJK.  Anyone that purchases anything online by 11/24 can enter this code.  We have reached a qualifying workshop already this month so I will draw a mystery hostess from those that purchased and the lucky winner will get the free merchandise (currently at $30).

Have a craftastic day,
Stacy