Showing posts with label Paper Princesses. Show all posts

Tuesday, November 5, 2013

Digital Scrapbook Days - Day 5 & Paper Pumpkin Projects


Today's digital download that is available today only for 50% off is:

Be Brave Pocket Cards - $2.98

http://www.stampinup.com/ECWeb/ProductDetails.aspx?productID=134840&dbwsdemoid=80380
Download includes:

* 7-page designer template (8-1/2" x 11")
* 53-piece SVG stamp brush set
* 9 embellishments
* 1 punch

Remember there is no shipping cost on digital downloads so you can take advantage of these daily specials!  And ordering digital downloads qualifies you towards this month's online workshop meaning you could be our November Mystery Hostess with the purchase of any of these kits!


Click the image below for more details on these downloads.
 
http://www.stampinup.com/ECWeb/ItemList.aspx?categoryid=1634&dbwsdemoid=80380
 
I cannot wait to buy the Today is the Day template - super clean and versatile to match up with other downloads that come with the software.


Today's weekly deals are up and there are great ones! 
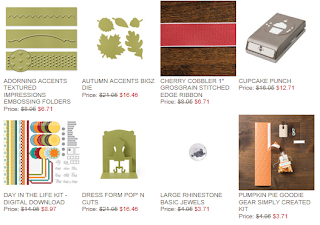
http://www.stampinup.com/ECWeb/ItemList.aspx?categoryID=1656&dbwsdemoid=80380
 

The hostess code for online orders for next month is G3SGBMJK.  Anyone that purchases anything online by 11/24 can enter this code.  If we reach a qualifying party total ($150), I will draw a mystery hostess from those that purchased and the lucky winner will get the free merchandise.


The other two projects for my Q2 Paper Princesses kits are below.  I really focused on the October kit since I know it was the set most didn't know what to do with.  The stamps we received in August (Bicycle and Thank You banner) and September (Wahoo & You Did It) were super easy to create straightforward cards with.  I also had a new customer join so I wanted to do something with the starter kit since everyone has that too.
 

Project One: Mini Note Book

This little project is something I needed for my purse.  Sometimes cell phones go out or you are driving and it's easier to jot a note than try to type on the phone (if you were born after 1990). 
 
The little green banner is the To Do banner stamped on Gumball Green cardstock.  Cut it out and turn it over - it creates an easy banner piece with perfectly equal tips and could be used on any project in any color. 

 
The book is bound with a 3/8 Bind-It-All coil and the pages on the inside are cut from the October
kit's paper role and adhered with adhesive.
 
 
Supplies:
Cardstock/DSP: Gumball Green, Calypso Coral, Whisper White
Ink; Gumball Green
Stamp Set: October Paper Pumpkin Kit
Accessories:  Bind-It-All (non-SU), Big Shot & Cutting Mats, Magnetic Platform, Polka Dot Embossing Folder, Apothecary Accents Framelits, Basic Rhinestones, Paper Snips, Dimensionals, and Adhesive
 
The second project uses the Paper Pumpkin Starter kit along with products from the October Paper Pumpkin Kit.    I originally intended to stamp the sentiment on the lined paper but neglected to use my Stamp-a-Majig so it was horribly crooked.  You could also use a 1/8 hold punch and your Paper Snips to create a spiral notebook look to this card too - I just saw that idea and would have used it if I'd seen it earlier!  I did sponge the edges of everything using the Stampin' Spot that came with the August kit.  You could also do this card with the Basic Gray included in the Starter kit.
 
Anyhow, I love this layout and color combo.  The splatter works so nice in the corners!  The flower itself is from the Pansy punch and then I bent the individual leaves in half to create the dimension I was looking for.  As for the button, I removed two threads from the leftover piece of Calypso twine that came with the October kit and threaded it through the Naturals button.  Tie it in a bow and trim the ends.  Attach with a dimensional.
 

Cardstock: Venetian Romance DSP, Crumb Cake, Early Espresso, Calypso Coral
Ink: Either Baked Brown Sugar or Basic Gray
Stamps: Pumpkin Starter Kit
Accessories: Natural Button, Twine from October PP kit, Pansy Punch, Dimensionals, Adhesive, Paper Snips


For more information on the Paper Pumpkin program and my Paper Princess customer rewards bonus, review this link: http://craftasticdayswithstacy.blogspot.com/2013/07/join-my-paper-princesses-club.html

Have a craftastic day,
Stacy

Monday, November 4, 2013

Digital Scrapbook Days - Day 4 & Paper Pumpkin Samples


Today's digital download that is available today only for 50% off is: Modern Medley Overlays Kit - $3.98
 
 
Download includes:
* 10-piece SVG stamp brush set
* 2 Designer Series Papers
 
Remember there is no shipping cost on digital downloads so you can take advantage of these daily specials!  And ordering digital downloads qualifies you towards this month's online workshop meaning you could be our November Mystery Hostess with the purchase of any of these kits!

The hostess code for online orders for next month is G3SGBMJK.  Anyone that purchases anything online by 11/24 can enter this code.  If we reach a qualifying party total ($150), I will draw a mystery hostess from those that purchased and the lucky winner will get the free merchandise.


Today's projects resolve around the October Paper Pumpkin Kit.  Like many of you, I opened this box and went.... hum....k....  After pulling all the supplies out, I realized that someone who likes to make lists like me really could use a project like this, it just needed some extra spoof.

First, I added a magnet clip to the top so that it can hang by the fridge.  This makes it more accessible and since I usually think of things I need to do or buy while slaving away in the kitchen, I found it is helping me be more organized during this Fall holiday season!  I'm including these magnets for my Paper Princess club, which are the customers that purchase 3 months worth of Paper Pumpkin kits from me.

Second, I added a little cluster of stamped/punched images to the bottom.  This made it feel more like a Stampin' Up! project and not something I bought while out and about.  The flower is a Calypso Coral flower made with the Pansy punch.  The center is the All Out Of stamp in Gumball Green on Whisper White.  I cut this out as my circle punch was lost in the craft cave at the time.  I also stamped the To Do banner and added that to give a little more to the flower

.
I also made some magnets using the leftover magnet sheets I had from the old catalog.  They would be good to hold up coupons tied to my grocery or menu planning lists or checks that I get during stamp camps.


Finally, I made a pen to hang on the top of the holder.  This is one of the mini projects I'm including in my Paper Princess club kits for my customers too.  I just cut a piece of the lined paper the length of my pen and adhered with Sticky Strip.  Then I added the rhinestones to give a gripper to my pen (have I mentioned later that I miss our microbeads for these pens?!?)  I love that it hangs there on the twine so I won't have to go hunting for a pen and forget what I needed to write down.  I'm deep in the pregnancy brain these days and cannot seem to remember much or hold onto much but at least I'm finally feeling better so I won't complain!


Some other ideas I came up with using these stamps:
  1. Use "To Do" stamp with birthday or thank you stamps.  Stamp To Do and then under it include "Wishing you a happy birthday" or "Thank You"
  2. Use "All Out Of" for a frazzled photo and handwrite words like "Patience".  Or put "All Out Of" and handwrite "Excuses" and use for a belated birthday card.
  3. Create the expressions you need to go with these sayings to use in cards or scrapbooking with My Digital Studio.  You can embellish them up, make them any color, and print them out on white cardstock.  Then add your stamped saying to them and voila, another hybrid project using the standard tools in MDS.

For more information on the Paper Pumpkin program, review this link: http://craftasticdayswithstacy.blogspot.com/2013/07/join-my-paper-princesses-club.html

Check out my blog tomorrow for the other two projects for my Paper Princesses!

Have a craftastic day,
Stacy
 

Friday, August 30, 2013

Last Day for My Paper Pumpkin Special - August 31st

 
If you sign up to receive Paper Pumpkin by August 31st (TOMORROW!), you can get it for $10 per month (plus tax) for the next two months.  Click Add Promo Code and then enter PUMPKINDEAL as the promo code field to participate.  Then you can either continue or skip a month or cancel after that.  This promotion is only for new paper pumpkin customers and is a great deal for those looking for a creative escape once a month!

https://mypaperpumpkin.com?demoid=80380

So what is Paper Pumpkin?  It is a kit of crafting supplies that will help you enjoy a creative escape once a month.  The cost of the kit is normally $19.95 which includes the shipping.  It typically breaks out to 4 cards or a 3D projects, 2-3 stamps, and 1-2 ink spots.  Your product comes in a cute little box and lands on your doorstep around the 18th of the month.  They contain everything you need (including instructions but excluding adhesive) to make the projects. 

To see samples using Paper Pumpkin products, click here:  http://craftasticdayswithstacy.blogspot.com/search?q=Paper+Pumpkin

These kits will be on trend and will be exclusive to members.  Once a month happens, the kits will not be available again.  So you have a chance to be a part of something exclusive and it gives you a surprise each month! 

And, if you decide that you need to skip a month once you sign up, you just log into your account and click Manage my Pumpkin and either skip the month or cancel.  If not, it will auto bill you on the 10th.   It’s that easy!

You can check out this page to see how to sign up!  http://craftasticdayswithstacy.blogspot.com/2013/07/join-my-paper-princesses-club.html 

The first kit you get is shown on the Web site.  It includes the clear block you will need for future projects (all the stamp sets in the kits will be clear mount as I understand it).  Then the next month, you will start getting the surprise kits on your doorstep and we can all ooh and ahh together.

The first group that joined me on this journey received adhesive pouches to help them complete the projects.  I won’t be doing this moving forward but I will be keeping up my quarterly princess events.  Any crafting princess that joins Paper Pumpkin will also get to participate in a fun free Princess stamping event.  To qualify for the free event, you need to have 3 kits under your belt since we will use those same supplies to make some cute projects and I will spoil you like every princess deserves. 

Feel free to forward this email to anyone that may be interested in this kind of monthly kit.
Remember to follow Craftastic Days with Stacy on Facebook to receive immediate updates: https://www.facebook.com/#!/CraftasticDaysWithStacy or just follow my blog!

Have a craftastic day and let me know if you have any questions,
Stacy

Friday, August 23, 2013

August My Paper Pumpkin Samples

Have you heard about the great My Paper Pumpkin deal going on until August 31st?  If you haven't already signed up, you can sign up for My Paper Pumpkin by August 31st and get the first two kits (delivered in mid-September & mid-October) for only $10 per month plus tax.  The first kit has two great stamps, a Gray Stampin' Spot, the D clear block and supplies for 4 cute cards.  For TEN DOLLARS?  Why haven't you signed up yet???  After your two month special is up, you can either continue on at $19.95 a month or you can defer or cancel. 
 
For those that have, this was the kit we received as existing members for August.  I love the bike and banner stamps - both very trendy - and love that the Stampin' Spots included Baked Brown Sugar since it's a great color to distress with.
 
The kits are designed to be put together in 30 minutes or less.  If you deviate from the instructions, it can take as long as your creative mind would like to take.  I always try to come up with some non-standard projects you can make with minimal outside supplies.


I tried to do a technique on my first card and it destroyed it.  So I decided to use that messed up card as a scrap paper where I could stamp and punch out wheels and circles.
 
This first card has the two wheels punched out with a 3/4 circle punch.  The banner was curled with a bone folder and adhesive was put on the pointed end.  Dimensionals were put on the middle and right side and slid under the bike tire.  I also put mini silver brads into the wheels for extra depth and shine.


The next card was the technique I messed up on the first card.  I stamped the bike first on the far right and then stamped it three more times moving it to the left each time. However, I was crooked on the tires so that is why the banner is strategically placed so that it's not so obvious!  :)  The tires and banners are on dimensionals again on this card.


This was fun.  I punched out a 1 3/4 circle from the messed up card.  Then I punched out a 3/4 circle where the yellow washi tape in the kit was on 3/4 of the circle.  I distressed the edges and attached it to the big circle using adhesive.  The banner is distressed too and elevated with dimensionals.  Two mini brads are under the banner.  Then I took the circle and put adhesive on the back of the circle.  I worked the Baked Brown Sugar Ruffled Ribbon around the circle for extra dimension.  Then I put the whole cluster on the card using dimensionals.


Finally, I was a card short since I used one for my scraps.  So I cut a Whisper White card and layered a piece of Whisper White on a piece of Bermuda Bay cardstock.  Those two layers are on the Cherry Cobbler piece that had the banner pieces in it.  I also created a cluster of triangles on the card to do a fun pattern.  The saying is on the bottom is up on dimensionals.


I hope you enjoyed these samples.  If you want more information about the perks of joining My Paper Pumpkin under me, you can check out the Join My Paper Pumpkin page for those benefits and instructions on how to sign up.  I hope you join our Paper Princesses group today!
 
Have a craftastic day,
Stacy

Monday, August 5, 2013

My Paper Pumpkin - Free Paper Princesses Projects

When individuals join My Paper Pumpkin under me and receive their first three kits, I will provide them a kit of supplies to make cards or 3D projects using the exclusive stamps and the Stampin' Spots that come with your kits.  They just have to use their adhesive to put them together and their scissors where needed!  Then the next time they achieve a set of three kits, they will get another free set of supplies to make hybrid projects from their kits.

This quarter's projects use the Hey There Friend, Hello to You, and Hooray for You stamps and inks. 


This card uses one of the pennants from the Hooray for You kit and the leftover hexagons from the Hello to You kit.  I love that the stamps from the kits create good grungy backgrounds!

 
This card just uses the stamp sets from the kits but I like how they are big enough to stamp on our punched images to provide dimension!  And a little bling never hurt anyone!


This project is a 2-4-6-8 box out of Soft Suede.  The cardstock is 8 1/2 x 5 1/2 and is scored every 2 inches vertically and then 2" from the bottom horizontally.  The banner, heart, and chevron are all out of a 2 x 4 1/4 piece of Very Vanilla.  The heart has a tiny pearl just because it should.  :)  The banner also uses the technique of covering the Hello in the saying and only stamping the "you."

 
At Convention, there was a lot of vintage projects shown and I fell in love with these doilies.  Never used them before but figured this was a great way to play with them.  I also took a sheet out of my Epic This and That journal and cut it into strips to add to this card because I needed something more subtle than I could find in my paper packs.  The strips of pearls work perfectly on our butterfly punches.  I love this card so much that I'm going to do it at my next camp!  It's using the stamps from the Paper Pumpkin starter kit and the ink from the Hello to You June kit.
 
I hope that my customers enjoy these projects and that you enjoyed seeing a few ways you can use these great projects outside of what is offered in your kit.
 
If you are interested in more details about my Paper Princesses group or the incredible Paper Pumpkin special until August 31st where it only costs you $10 a month and shows up at your door, please click the Join My Paper Pumpkin link at the top of my blog!
 
You need to sign up by August 10th to get the starter kit in August - if not, it will ship to you in September!
 
Have a craftastic day,
Stacy