Showing posts with label Holiday Scrapbook. Show all posts

Friday, November 22, 2013

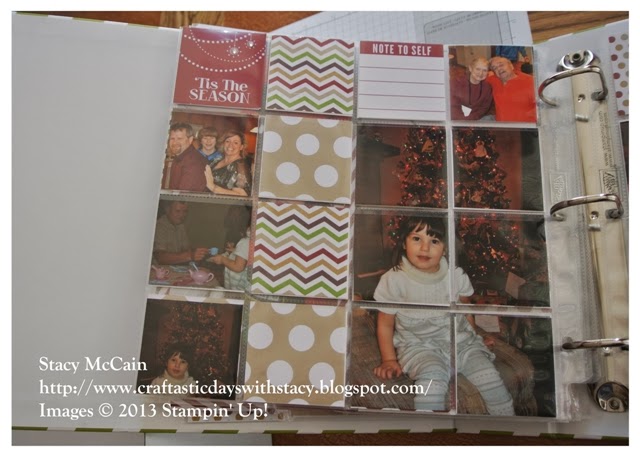
Holiday Scrapbooking - Day 8 - Titles and Journaling

This is the last post in my series about our divided page protectors and Season of Style products.  Several of these items are currently on sale for our Holiday sale.  Links to these products are below.

8 x 8 Divided Page Protectors - 132544 - on sale for $3.96


Season of Style This & That Bundle - 136531 - exclusive bundle on sale for $21.44


Seasonal Stripes 8 x 8 Designer Ring Album - 132259 - on sale for $11.96


Our online party is over $300 which means the lucky winner will get $50 in free merchandise!!!  To be considered for this drawing, place an online order by midnight on 11/23 with the hostess code of G3SGBMJK.  Callie will draw a name from all those that placed online orders on 11/24 and that lucky winner will get the free merchandise!

Once you have your photos in the book, you will want to add some journaling and titling.  You could cut this in cardstock and write them by hand.  Some people have that skill.  I do not.  I like to wordsmith.

There are several reasons I like using My Digital Studio for journaling and titles.

  1. With My Digital Studio, you can set the size of your text box in Edit Object so that the text inside is the perfect size for your project.  This may because you want to mat it on a 2 x 2 square or because you want to punch it out using one of our great punches or you want it to be exactly 3 3/4 long.
  2. You can also change the colors to match the Stampin' Up! colors used in the rest of your project. 
  3. You can add text boxes directly to photos so that it prints with the journaling directly on the photo.
Here are my tips for how to create your titles and journaling in My Digital Studio and print on White 8 1/2 x 11 cardstock.

Creating Journaling & titles in MDS
  • Click Photobooks & Individual Pages
  • Select 8 1/2 x 11 Portrait
  • Select Create Your Own
  • Name the project - Holiday Titles
    • If you need to put it in a specific folder, click Change Location, click on the folder,  and click Select Folder.  If it's already selected, skip this step.
  • Click OK
Adding Text
  • Click the Text header from the Design Center (on the right)
  • Click Add Text
  • Type your text
  • Click the Select Font dropdown and select your font
  • Change the Size as needed
  • Click Change color to change to Cherry Cobbler, Old Olive, or Crumb Cake (the colors in your Season of Style paper)
  • Repeat for all titles or journaling you want to create.
  • Click Ctrl-S to save.
Printing your Titles:
  • Select Share from the Design Center (on the right)
  • Click Print
  • Save if prompted
  • Click Print
  • Print out using Whisper White cardstock and cut out into banners or punch out with punches. 


My Digital Studio (MDS) creates a great stocking stuffer for the crafter on your list that wants to explore digital scrapbooking or is looking for a great photo editing software and so much more.  You can order an MDS cd here.
Have a craftastic day,
Stacy

Thursday, November 21, 2013

Holiday Scrapbooking - Day 7 - Embellishing Pocket Cards

Customers taking my class were given a package of basic rhinestones to decorate their pocket cards and other elements of the book.

If you do not find all the pocket cards you would like, you can download the Season of Style Pocket Cards and make your own in MDS.

Making Pocket Cards in MDS

Creating the Project
  • Open MDS
  • Click Photobooks & Individual Pages
  • Select 8 1/2 x 11 Portrait
  • Select Create Your Own
  • Name the project - Holiday Pocket Cards
    • If you need to put it in a specific folder, click Change Location, click on the folder,  and click Select Folder.  If it's already selected, skip this step.
  • Click OK
Finding the Cards
  • Click the Flower icon under Resource Palette (left) - this opens your embellishments
  • Click Browse
  • Click Designer Kits
  • Select Season of Style Pocket Cards - Embellishments
  • Click Open
  • Resizing the Embellishment
  • Drag the Embellishment from the left into the project.
  • Right click on the image and select Edit Object
  • Change the W & H to the right size and unclick the Keep Proportions box
  • Click the red X to close the box.
  • Repeat until all your elements are created.
Printing the Embellishments
  • Select Share from the Design Center (on the right)
  • Click Print
  • Save if prompted
  • Click Print
  • Print out using Whisper White cardstock and cut using your Paper Trimmer.
Have a craftastic day,
Stacy

Wednesday, November 20, 2013

Holiday Scrapbooking - Day 6 - Mini Book - Pocket Book


Today kicks off our annual holiday sale!  For 24 hours only, you can get the three products below at a discount.  I have all three and that Trimmer is a MUST!  The markers make crafting with our great colors quick and easy.  The Diagonal plate will help make boxes and mini books for the holidays and other occasions a breeze!
The rest of the products will be on sale until 12/2!  Check them out here: http://www.stampinup.com/ECWeb/CategoryPage.aspx?categoryid=1664

Since the holiday scrapbook and divided page protectors are on sale, it works perfectly with my series of posts on this great album!

Some of the page protectors lend themselves to inserting little mini books versus single photos so that you can get more happy holiday faces into your scrapbook!  This is the final mini book/insert idea that I did for this holiday scrapbook.  It came about because I had a stack of photos celebrating our family tradition of making covered pretzels for all the grandparents!

 
 I couldn't decide on my favorites and couldn't narrow it down to just 4 photos!


  • Score a 4 x 11 piece of cardstock at 5 1/2.  Fold in half.  Attach the Let's Be Jolly card to the front of the piece using adhesive. 
  • Open the cardstock back up.  Attach a 4 x 2 piece of Old Olive to the bottom of the piece using washi tape around the edges and the bottom.** Attach the 4 x 2 piece of Cherry Cobbler to the bottom.  If you like how the washi tape looks, you don't have to do this - but I didn't.... :) 
  • Stamp the saying in Cherry Cobbler ink on the 1 x 3 1/2 piece of Crumb Cake.  Make a banner end on the right using your scissors or the hexagon punch.  Tie a knot in the small piece of Grosgrain Ribbon and attach to the left end of the banner using adhesive on the back to hold it.  Attach to the pocket using dimensionals. 
  • Insert photos into your pocket.
  • Cut the journaling piece off the Glad Tidings pocket card.  Cut to 3 1/2 x 3 7/8.  Attach to the upper piece of the book.  Insert a 1" x 4" piece of DSP to the bottom of that journaling tag. 
  • Put adhesive on the back of the book and attach to a piece of 4 x 6 polka dot DSP.
 
Tips:
  • Using washi tape to make a pocket instead of sticky strip gives you a bigger pocket.  Sticky strip cuts 1/4 inch off each side.  Washi tape wrapped around the edges gives you a true 4" wide pocket. 
  • You can put a photo directly on the back of this folder.  If the other side of the page is another event or theme, you can leave the back of this pocket book blank and put a sheet of 4 x 6 DSP lose behind the book instead to hook your picture too.  That way you aren't pulling out the insert and finding a tree cutting photo when you were scrapbooking a sweet treat in the mini book.
Our online party is over $300 which means the lucky winner will get $50 in free merchandise!!!  To be considered for this drawing, place an online order by midnight on 11/23 with the hostess code of G3SGBMJK.  Callie will draw a name from all those that placed online orders on 11/24 and that lucky winner will get the free merchandise!
 
Have a craftastic day,
Stacy
 

Tuesday, November 19, 2013

Holiday Scrapbooking - Day 5 - Mini Book - File Folder

Some of the page protectors lend themselves to inserting little mini books versus single photos so that you can get more happy holiday faces into your scrapbook!  Here is my 3rd idea for making more room for photos!
  • Score a 7 1/2 x 6 piece of Cherry Cobbler cardstock at 4 inches. 
  • Using the Envelope Punch board, create a file tab at the top of the 4" side.  Do this by inserting the top on the punch board so that it aligns with the 3" mark.  Push the button on the board. 
  • Turn over and align the other side to the button so that the end of the cardstock is directly in the center of the button.  Push the button to punch out. 
  • Use the paper trimmer or scissors to cut off the unwanted Cherry Cobbler and make the tab. 
  • Turn two scraps of DSP that you cut off into banners using scissors or hexagon punch and attach to the file folder AFTER you attach your photo to the front. 
  • Adhere a long one using adhesive and a short one using dimensionals.
  • Then put two photos on the inside, adding more embellishments or banners, if desired, and one on the back.

You could really embellish this one up.  I didn't because I had large funny photos to use so I wanted to highlight those photos and not cluster embellishments.  I've received some great swap cards using this same idea that I will post soon.

Have a craftastic day,
Stacy

Monday, November 18, 2013

Holiday Scrapbooking - Day 4 - Mini Book - Banner Pull Out


Some of the page protectors lend themselves to inserting little mini books versus single photos so that you can get more happy holiday faces into your scrapbook!

This one isn't a mini book as much as a solution for pull outs in divided albums in general.  I've found in the past that if I use a tab on a photo, it eventually comes unglued.  I'm not a fan of staples and I have never actually sewed on a card.  So I was trying to find a way to pull out photos to easily see what is on the other side.  In this case, it's my lovely Grandma on one side and my adorable Mother-in-Law on the other.  To do this technique, you have to put something on each side to cover up the hole.
 
 
Directions:
  • Punch a hole with the small heart punch at the top of the Old Olive 4 x 6 piece, about 1/2 from the top.  The point of the bottom of the heart should face the right edge of the cardstock.
  • Take one of the strips leftover from cutting your DSP and fold in half. 
  • Insert it into the heart and add adhesive to keep it closed. 

  • Create a banner end using your scissors or the hexagon punch. 
  • Layer a photo on the front and back of the cardstock to cover up the hole.
Have a craftastic day,
Stacy

Sunday, November 17, 2013

Holiday Scrapbooking - Day 3 - Mini Book - Swatchbook

Some of the page protectors lend themselves to inserting little mini books versus single photos so that you can get more happy holiday faces into your scrapbook! 
 
Directions:
  • Layer the Pocket card shown with the 2 pieces of Crumb Cake (cut at 4 x 6). 
  • Punch a hole in the upper corner using the paper piercing tool. 
  • Insert a brad base. 
  • Insert a Crumb Cake Candy Dot. 
  • Create a banner using your scissors or the hexagon punch out of a strip of diagonal stripes left over from cutting up your DSP. 
  • Attach to the book using dimensionals. 
  • Insert a strip of DSP to the last page after you add your photo to cover the brad legs, if desired
 

Tips:
  • Make sure your pictures are put in the swatchbook the right way or they will be upside-down when someone opens the book.
  • Don't cover the brad legs with a dimensional - it will make it hard for the book to turn and open.
  • If you had 4 x 6 photos that you didn't want to cut down, you could just add them directly to the swatchbook so that they swivel instead of using the Crumb Cake cardstock.
Have a craftastic day,
Stacy

Saturday, November 16, 2013

Holiday Scrapbooking - Day 2 - Creating Photo Templates in MDS

The important part of any album is the photos in it.  With these divided protectors, you can fit in a LOT of them.  I struggled to figure out how to get the right ratio and the right images in my 2 x 2 slots which lead me to look in My Digital Studio to see if there was something to help there.  Here is what I figured out.

Filling the Divided Protectors
 

You can always cut down your photos so that they fit the various holes in the template.  The templates have the following sizes of photos (H x W) and the quantity represents the pages being double-sided.
  • 2 x 2 - 80
  • 4 x 4 - 16
  • 4 x 6 - 4
  • 4 x 2 - 4
  • 6 x 4 - 4
  • 2 x 4 - 4
  • 3 x 4 - 4
  • 4 x 3 - 16
Other ideas:
  • You can fill the holes using photos, pocket cards, cardstock, Designer Series Paper (DSP), or elements created through My Digital Studio (MDS).
  • You can mat your photos so that the colored paper on the back of the photos shows on the other side of the protector.
  • You can use the embossing folders on cardstock to insert in the holes and then mat your smaller photo on them.
  • You can cut a photo to 4 x 4 and then cut it to 4 photos at 2 x 2 and put that in your album or cut a 4 x 6 into 6 2 x 2 squares. I did this with the photo of Callie below.  This idea was courtesy of Ronda Wade and provided during Creative Convention Online - Holiday Edition.  When doing this, make sure you don't cut through the face to split it up and make it look like a Halloween photo instead of a holiday photo!


MDS Tips for resizing photos for divided protectors

 
You can create a template in MDS that allows you to zoom in on photos to make them the correct size for the divided protectors.  Then you can print them out on 4 x 6 sheets on your own printer or at a kiosk somewhere.
 
Creating the Template:
  • Open MDS
  • Click Custom
  • Set size parameters at the top as 4 inches (width) x 6 inches (height)
  • Click Create Project
  • Name - 2x2 template
    • If you need to put the template in a specific folder, click Change Location, click on the folder,  and click Select Folder.  If it's already selected, skip this step.
  • Click OK.
Adding Photo Boxes:
  • Click Photos from the Design Center (on the right)
  • Click Photo Box
  • Right click on the photo box and select Edit Object
  • Change the W to 2 and the H to 2
  • Uncheck box by Keep Proportions
  • Click the red x to close the box
  • Click on the photo box and click Ctrl-C
  • Click below it and click Ctrl-V
  • Repeat so you have 3 boxes
Aligning Photo Boxes
  • Hold down on your Ctrl key and left mouse click on all three photo boxes
  • Right click on one box and click Select Align
  • Select Left
  • Right click and select Align again
  • Select Space Evenly - Vertically
  • While all three boxes are still selected, click Ctrl-C
  • Click Ctrl-V - this creates a new aligned row of boxes
  • Drag the boxes to the left
  • Click Ctrl-S to Save your template
  • Click File from the upper right and click Save As.  Re-save as Christmas  2x2 - otherwise you will be saving into your template so you won't be able to use it on future divided protector projects.
Adding Photos to the template
  • Right click on Page 1 at the bottom - Insert Duplicate Page
  • Repeat for as many photos as you will need
  • Under the Resource Palette on the left, click the camera icon and click Browse to find the folder with your photos.
  • Once you find the folder, click Open
  • Drag each photo over into your project on a photo box until the box turns blue
  • Use the + magnifying glass button to zoom into your photo so you capture the part of the photo you want to include.  Drag the box so that it hightlights the right part of your photo.  Click OK.
  • Repeat this process until all photos have been added.
  • Click Ctrl-S
Printing the Photos
  • Click Share from the Design Center on the right.
  • Select Export Pages - JPG PNG PDF
  • Click Change Location, Select the folder, & click OK
  • Click Finish
  • Click OK when prompted that the save is complete.
  • When you go to print the photo, you will print it as a 4x6.  Then you can cut out the 2x2 squares to use in the dividers for the album.
You can repeat this process by creating additional templates to help with the divided pages if desired.  Potential templates are:
  • Vertical 2 x 3 -  4 x 6 template for a four vertical 2 x 3 photos
  • Horizontal 2 x 4 - 4 x 6 template for three 2 x 4 horizontal photos
  • Horizontal 4 x 3 - 6 x 4 template for two 4 x 3 horizontal photos
  • Vertical 3 x 2 - 6 x 4 template for three 3 x 2 vertical photos
  • 4 x 4 - 4 x 4 template for a 4 x 4 picture.
 
You could use this same technique for any size of mini album or trying to fit a perfectly sized photo into your This and That books.

Haven't used My Digital Studio?  You can download the free trial for 30 days here or you can purchase the software for only $19.99 as a download or as a cd.  I use My Digital Studio for all my photo editing, printing, and design for photo cards, calendars, mini books and home décor.  I will help you learn to use it so have no fear.
 
Have a craftastic day,
Stacy

Friday, November 15, 2013

Holiday Scrapbooking - Day 1 - The Cover & Photo Selection Tips

Last night I taught a holiday scrapbook that was one of my favorite classes I've done since becoming a demonstrator.  I loved the customers that came and they loved the project and the incredible deal they got since I can't do math.  For $35, they received the following merchandise:
Because the class was small and I think this project is a great one to do over the holidays, I thought I'd share the class content and pictures over the next week.  I really hope that you take the challenge to do one of these albums yourselves.  They take just a few hours from start to finish and set you up for a great holiday memento. Or, use the tips below to complete other great projects!

The cover of any album is something that I actually design last.  I need to get a feel for what's in the album before I work on the cover!  
 
 
Instructions:
Create the folder out of Crumb Cake DSP.  Do this by inserting the top on the punch board so that it aligns with the 3" mark.  Push the button on the board.  Turn over and align the other side to the button so that the end of the cardstock is directly in the center of the button.  Push the button to punch out.  Use the paper trimmer or scissors to cut off the unwanted Crumb Cake DSP and make the tab.   Create two banners out of the scrap of DSP and the scrap of Cherry Cobbler.  Attach using adhesive.  Layer the December Pocket card over them using dimensionals.  Punch out 2012 using the pieces of Cherry Cobbler provided and the sizzlits.  Adhere to the bottom of the folder using adhesive.  I recommend you apply adhesive using the silicon mat so that the adhesive only sticks to the letter. 
 
Tips:
  • When you cut down your DSP, cut it to 4 x 6.  This gives you two pieces of DSP to use for a short and long banner.  You will end up with a LOT of these! 
  • Use the side of the hexagon punch to make your banners - makes them all even and you can do several layers of DSP at a time!
  • When applying adhesive to small elements like the numbers, use the Silicon Sheet.  It will only allow the adhesive to stick to the back of the numbers and not to anything else!
Supplies:
1 piece of Crumb Cake from Season of Style Print Pack, Cherry Cobbler for numbers and banner, Big Shot, Sizzix Numbers, Envelope Punch Board, Season of Style Pocket Cards, Hexagon Punch, Dimensionals,  Silicon Sheet, Adhesive.
 
Wondering how to start on a project like this?  Here are a few tips for organizing photos for the holidays.
 
1 - Look through your photos to find themes for your photos.  Possible themes are:
  • Christmas Eve
  • Christmas Morning
  • Christmas Crafts
  • Christmas Parties
  • Decorating the Tree
  • Christmas Baking
  • Christmas Traditions
2 - You also need to determine if you want to scrapbook a specific year in this book or multiple years.
 
3 - Once you have your photos identified and sorted by theme, you can figure out which divided page best suits that series of pictures.
 
Tomorrow I'll offer up some creative uses of My Digital Studio for this book and more!
 
Have a craftastic day,
Stacy