Showing posts with label My Digital Studio. Show all posts

Friday, November 22, 2013

Holiday Scrapbooking - Day 8 - Titles and Journaling

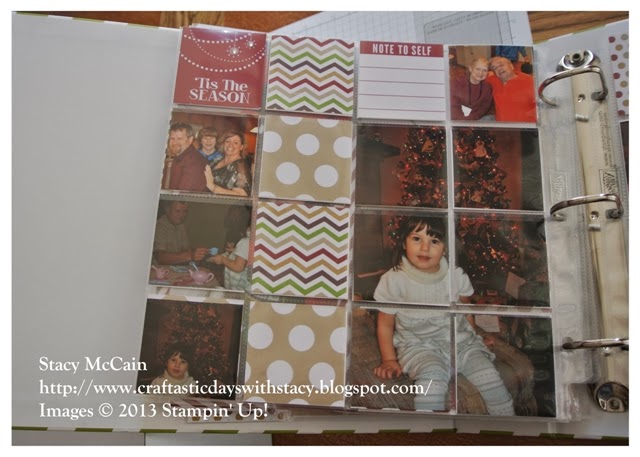
This is the last post in my series about our divided page protectors and Season of Style products.  Several of these items are currently on sale for our Holiday sale.  Links to these products are below.

8 x 8 Divided Page Protectors - 132544 - on sale for $3.96


Season of Style This & That Bundle - 136531 - exclusive bundle on sale for $21.44


Seasonal Stripes 8 x 8 Designer Ring Album - 132259 - on sale for $11.96


Our online party is over $300 which means the lucky winner will get $50 in free merchandise!!!  To be considered for this drawing, place an online order by midnight on 11/23 with the hostess code of G3SGBMJK.  Callie will draw a name from all those that placed online orders on 11/24 and that lucky winner will get the free merchandise!

Once you have your photos in the book, you will want to add some journaling and titling.  You could cut this in cardstock and write them by hand.  Some people have that skill.  I do not.  I like to wordsmith.

There are several reasons I like using My Digital Studio for journaling and titles.

  1. With My Digital Studio, you can set the size of your text box in Edit Object so that the text inside is the perfect size for your project.  This may because you want to mat it on a 2 x 2 square or because you want to punch it out using one of our great punches or you want it to be exactly 3 3/4 long.
  2. You can also change the colors to match the Stampin' Up! colors used in the rest of your project. 
  3. You can add text boxes directly to photos so that it prints with the journaling directly on the photo.
Here are my tips for how to create your titles and journaling in My Digital Studio and print on White 8 1/2 x 11 cardstock.

Creating Journaling & titles in MDS
  • Click Photobooks & Individual Pages
  • Select 8 1/2 x 11 Portrait
  • Select Create Your Own
  • Name the project - Holiday Titles
    • If you need to put it in a specific folder, click Change Location, click on the folder,  and click Select Folder.  If it's already selected, skip this step.
  • Click OK
Adding Text
  • Click the Text header from the Design Center (on the right)
  • Click Add Text
  • Type your text
  • Click the Select Font dropdown and select your font
  • Change the Size as needed
  • Click Change color to change to Cherry Cobbler, Old Olive, or Crumb Cake (the colors in your Season of Style paper)
  • Repeat for all titles or journaling you want to create.
  • Click Ctrl-S to save.
Printing your Titles:
  • Select Share from the Design Center (on the right)
  • Click Print
  • Save if prompted
  • Click Print
  • Print out using Whisper White cardstock and cut out into banners or punch out with punches. 


My Digital Studio (MDS) creates a great stocking stuffer for the crafter on your list that wants to explore digital scrapbooking or is looking for a great photo editing software and so much more.  You can order an MDS cd here.
Have a craftastic day,
Stacy

Thursday, November 21, 2013

Holiday Scrapbooking - Day 7 - Embellishing Pocket Cards

Customers taking my class were given a package of basic rhinestones to decorate their pocket cards and other elements of the book.

If you do not find all the pocket cards you would like, you can download the Season of Style Pocket Cards and make your own in MDS.

Making Pocket Cards in MDS

Creating the Project
  • Open MDS
  • Click Photobooks & Individual Pages
  • Select 8 1/2 x 11 Portrait
  • Select Create Your Own
  • Name the project - Holiday Pocket Cards
    • If you need to put it in a specific folder, click Change Location, click on the folder,  and click Select Folder.  If it's already selected, skip this step.
  • Click OK
Finding the Cards
  • Click the Flower icon under Resource Palette (left) - this opens your embellishments
  • Click Browse
  • Click Designer Kits
  • Select Season of Style Pocket Cards - Embellishments
  • Click Open
  • Resizing the Embellishment
  • Drag the Embellishment from the left into the project.
  • Right click on the image and select Edit Object
  • Change the W & H to the right size and unclick the Keep Proportions box
  • Click the red X to close the box.
  • Repeat until all your elements are created.
Printing the Embellishments
  • Select Share from the Design Center (on the right)
  • Click Print
  • Save if prompted
  • Click Print
  • Print out using Whisper White cardstock and cut using your Paper Trimmer.
Have a craftastic day,
Stacy

Saturday, November 16, 2013

Holiday Scrapbooking - Day 2 - Creating Photo Templates in MDS

The important part of any album is the photos in it.  With these divided protectors, you can fit in a LOT of them.  I struggled to figure out how to get the right ratio and the right images in my 2 x 2 slots which lead me to look in My Digital Studio to see if there was something to help there.  Here is what I figured out.

Filling the Divided Protectors
 

You can always cut down your photos so that they fit the various holes in the template.  The templates have the following sizes of photos (H x W) and the quantity represents the pages being double-sided.
  • 2 x 2 - 80
  • 4 x 4 - 16
  • 4 x 6 - 4
  • 4 x 2 - 4
  • 6 x 4 - 4
  • 2 x 4 - 4
  • 3 x 4 - 4
  • 4 x 3 - 16
Other ideas:
  • You can fill the holes using photos, pocket cards, cardstock, Designer Series Paper (DSP), or elements created through My Digital Studio (MDS).
  • You can mat your photos so that the colored paper on the back of the photos shows on the other side of the protector.
  • You can use the embossing folders on cardstock to insert in the holes and then mat your smaller photo on them.
  • You can cut a photo to 4 x 4 and then cut it to 4 photos at 2 x 2 and put that in your album or cut a 4 x 6 into 6 2 x 2 squares. I did this with the photo of Callie below.  This idea was courtesy of Ronda Wade and provided during Creative Convention Online - Holiday Edition.  When doing this, make sure you don't cut through the face to split it up and make it look like a Halloween photo instead of a holiday photo!


MDS Tips for resizing photos for divided protectors

 
You can create a template in MDS that allows you to zoom in on photos to make them the correct size for the divided protectors.  Then you can print them out on 4 x 6 sheets on your own printer or at a kiosk somewhere.
 
Creating the Template:
  • Open MDS
  • Click Custom
  • Set size parameters at the top as 4 inches (width) x 6 inches (height)
  • Click Create Project
  • Name - 2x2 template
    • If you need to put the template in a specific folder, click Change Location, click on the folder,  and click Select Folder.  If it's already selected, skip this step.
  • Click OK.
Adding Photo Boxes:
  • Click Photos from the Design Center (on the right)
  • Click Photo Box
  • Right click on the photo box and select Edit Object
  • Change the W to 2 and the H to 2
  • Uncheck box by Keep Proportions
  • Click the red x to close the box
  • Click on the photo box and click Ctrl-C
  • Click below it and click Ctrl-V
  • Repeat so you have 3 boxes
Aligning Photo Boxes
  • Hold down on your Ctrl key and left mouse click on all three photo boxes
  • Right click on one box and click Select Align
  • Select Left
  • Right click and select Align again
  • Select Space Evenly - Vertically
  • While all three boxes are still selected, click Ctrl-C
  • Click Ctrl-V - this creates a new aligned row of boxes
  • Drag the boxes to the left
  • Click Ctrl-S to Save your template
  • Click File from the upper right and click Save As.  Re-save as Christmas  2x2 - otherwise you will be saving into your template so you won't be able to use it on future divided protector projects.
Adding Photos to the template
  • Right click on Page 1 at the bottom - Insert Duplicate Page
  • Repeat for as many photos as you will need
  • Under the Resource Palette on the left, click the camera icon and click Browse to find the folder with your photos.
  • Once you find the folder, click Open
  • Drag each photo over into your project on a photo box until the box turns blue
  • Use the + magnifying glass button to zoom into your photo so you capture the part of the photo you want to include.  Drag the box so that it hightlights the right part of your photo.  Click OK.
  • Repeat this process until all photos have been added.
  • Click Ctrl-S
Printing the Photos
  • Click Share from the Design Center on the right.
  • Select Export Pages - JPG PNG PDF
  • Click Change Location, Select the folder, & click OK
  • Click Finish
  • Click OK when prompted that the save is complete.
  • When you go to print the photo, you will print it as a 4x6.  Then you can cut out the 2x2 squares to use in the dividers for the album.
You can repeat this process by creating additional templates to help with the divided pages if desired.  Potential templates are:
  • Vertical 2 x 3 -  4 x 6 template for a four vertical 2 x 3 photos
  • Horizontal 2 x 4 - 4 x 6 template for three 2 x 4 horizontal photos
  • Horizontal 4 x 3 - 6 x 4 template for two 4 x 3 horizontal photos
  • Vertical 3 x 2 - 6 x 4 template for three 3 x 2 vertical photos
  • 4 x 4 - 4 x 4 template for a 4 x 4 picture.
 
You could use this same technique for any size of mini album or trying to fit a perfectly sized photo into your This and That books.

Haven't used My Digital Studio?  You can download the free trial for 30 days here or you can purchase the software for only $19.99 as a download or as a cd.  I use My Digital Studio for all my photo editing, printing, and design for photo cards, calendars, mini books and home décor.  I will help you learn to use it so have no fear.
 
Have a craftastic day,
Stacy

Sunday, November 10, 2013

Holiday Calendar Prep Underway

Before My Digital Studio, Stampin' Up! used to sell calendars. Mom and I would spend months designing and prepping kits and it was our most popular and most difficult class of the year.  Since buying MDS and learning how to use it, I've been able to make my calendars in under an hour!  And that's without a template!

This year I am making 12 x 12, Desktop, and Easel calendars.  Below is a sample page from the October calendar page in Conlyn's calendar.  The month is on the first side and this is the back of the easel.  These photos capture our Halloween evening, our pumpkin picking, and also our pumpkin carving party this year!

 
Supplies:
 
Background
  • Color = VERY VANILLA 254,249,232
Stamps
  • Yippee Skippee\Yippee Skippee - you can never have too much happy, Color = PUMPKIN PIE 255,130,1
  • All Holidays\All Holidays - halloween, Color = PUMPKIN PIE 255,130,1
 
 
Couple design elements to mention:
  • Cropping - I used the Happy Halloween from All Holidays and used the cropping too to remove the Happy.  Then I could use the sentiment from Yippee-Skippee with this image and get it to follow my frames.
  • Photo Frames & Base Colors - I turned the base of my calendar to Very Vanilla so the white mats would show up against them like frames.  Then you use the drop shadow feature to make them look raised and it looks like a photograph with a border.
  • Bleed Area - Make sure you turn on the Desktop Calendar bleed area with these easel calendars.  If you use the Calendar bleed area, your elements will not be spaced evenly on the top and bottom.
We are off for family photos today so I hope you have a craftastic day and a great Sunday doing something you enjoy!
 
Stacy


Tuesday, October 22, 2013

25% off 25 Stamp Sets & Weekly Specials


From today until October 28th, you can order these great stamp sets for 25% off as part of Stampin' Up!'s 25th Anniversary celebration!

Review the stamp sets here!

 
It's Tuesday which means more weekly specials from Stampin' Up!  Click the image below for more details on these products.  They will be discounted for 1 week and are available while supplies last. 
 
 
Since the Dress Up Framelits are on sale for 25% off, I will finally get them to make dress up magnets for Callie!


It's also Digital Tuesday so there are some great new downloads.  I'm excited to see the Holly Jolly Overlays - I think that's exactly what I need for my Christmas cards this year!  Now if I could only settle on a picture for that card!

Click the image below to be taken to the page with more information on each download! Contact me today if you would like to get in an MDS basics class for free before the holiday season hits full swing!


Since there is something for everyone in today's specials, remember that there is one more perk to ordering online today!

When you order online, make sure you use hostess code TUBSEAHG and be entered for a drawing as the mystery hostess at the end of the month.  I have enough orders to qualify for a $250 workshop so someone will be a lucky winner of at least $65 in free merchandise!!!!  I will draw a name on 10/24!

If you have an order of $150 or more, do not add a hostess code as you are your own hostess!

Have a craftastic day,
Stacy

Tuesday, October 1, 2013

New Downloads and Stamp Sets

I wanted to devote my blog post today to my sister and her big milestone birthday but it's also the first of the month which means there are specials to announce.


The winning stamp set from the In With You program is called Monstermaniacs and is being released just in time for Halloween stamping.  This set was designed by Doris.  Click on the image for more information!

If you have ideas that you'd like to see in stamp sets, check out http://inwithyou.ideascale.com for more information.

Every month in 2013, Stampin' Up! is releasing a clear mount stamp set that contains favorite images from years past and a new image exclusive to the set.  This month's set is Best of Christmas and you'll see Dasher definitely made that cut.  If you purchase six of these sets over the year, you can get a stamp set for $14.95 for free!

To view all the Best of Sets, visit here: http://www.stampinup.com/ECWeb/ItemList.aspx?categoryID=1226


It's Digital Tuesday and there are lots of new holiday themed downloads to help you with your holiday crafting!  Click the image below to go to the newest download page and then you can click on the individual downloads for more information.

 
Don't forget that I have an MDS digital class the first Monday of the month.  This month's class is digital Christmas cards.  Leave a comment or email me if you are interested in joining us and learning how to make Christmas cards and newsletters in MDS for the holidays!


 From October 7th to October 21st, you can sign up to be a demonstrator for only $25!  This special is part of the 25th anniversary of Stampin' Up!  For $25, you get $26.95 worth of Stampin' Up! product and a business pack which includes a box of catalogs, seasonal catalogs, Getting Started DVD, Starter Kit Business Booster Brick (order forms), and customer postcards.

As a new recruit, you earn an extra 10% on the first order of $150 or more when you place an order within 45 days of becoming a demonstrator.  You will also get 2 months free of a Demonstrator Business Web Site.  There are a lot of perks in joining my team and joining the SU! family.  Contact me today for more information if you are at all interested in this opportunity!

When you host a party from October 1 - October 31st, you can get an extra $25 worth of merchandise if you have a party of $250.  That means you get $65 free instead of $40.  That is a great deal too!  I love that we are getting spoiled by their anniversary!

That's a lot of love for the first of the month.  The day was pretty good being my sister's birthday but now it's even more exciting!  :)

Have a craftastic day,
Stacy

Sunday, September 29, 2013

Our Canning Adventures

I am part of a crafting group that is made up of mommies (and one wonderful aunt that will be a great mommy someday.)  While we all love our families, we needed a little break from our husbands, children, and routines.  So we started getting together and doing either projects (like Joanna teaching us to sew) or to bring our own projects (everyone else is a knitter but me!)  It's been a fun way to get to know each other better and also to branch out into creative things we don't always have time for.

Last October, our Crafting Group decided that they wanted to learn to can.  Through parents and books, we figured out how to keep ourselves from poisoning our family and friends and a new passion was born.  I cannot wait for Callie to be old enough that I can pass this knowledge on to her.  I was a hard sell - I showed up with nothing thinking that I would just help with the canning they were all doing.  I ended up at Wal-Mart (my least favorite place on EARTH) and buying a canner, jars, tools, etc.  I even asked if I could just buy a person at Wal-Mart to can for me since it looked like a lot of work.  This is when I solidified my canning nickname of Silver Spoon.

Since that fateful day in October, I have made my own peaches, applesauce, and some great butters that tasted even better when I added Crown Royal to them.  Yum.... (taking a quick pause to remember how wonderful alcohol tastes since pregnant me obviously hasn't had any for a long time!)  This year I even made freezer jam and my father is going to eat me out of my supply so it's a good thing I made a lot!

My mother always made the most wonderful jams and jellies and I haven't yet branched into this territory.  I can remember the taste of her huckleberry jam growing up - full of sugar and love - but I don't remember her making it.  I'm assuming that's because I was accident prone and was never allowed to be that close to the stove.  :)  I look forward to when we get together and she shares that knowledge now that I have an interest in it. 

My grandmother was a great canner but much of that knowledge has faded as she has grown older and her memories have started to fade.  It's a very sad thing to face and that is why I plan on documenting these things for Callie now so that she doesn't have to rely on my memory to do this for her family.

I haven't made labels this year for my mason jars because I haven't decided what I'm giving away yet.  Last year I used the Friendship Preserves set but this year I'm going to use the digital kit so that I can size them depending on the size of the jar.


This digital download is only $3.95 and comes with the four images above plus a punch the shape of the stamps so you can make your own labels!  If you would rather use the stamp set, you can find the Wood Mount for $21.95 or the Clear Mount for 16.95.
 
The hostess code for October is TUBSEAHG.  If you place an order online during October under $150 in merchandise, use this code and then I will draw a mystery hostess to get the hostess benefits if the October online orders qualify.

So what brought on this post?  Ilene is on her way over so we can finish her applesauce together because canning is more fun with good friends and company. 

I have to recommend Williamson Orchards & Vineyards to get your local fruit for canning if you are in the Boise/Marsing area.  Their Web site is http://www.willorch.com/ and they are kind and wonderful people.  Their honeycrisp apples are amazing and that is what we are using today!

I love that we can support local businesses, good friends, and make memories all with the simple act of canning.

Have a craftastic day,
Stacy