Showing posts with label Tag. Show all posts

Tuesday, December 20, 2016

Countdown to Christmas - Day 20

We are so close to the end of school and the excitement of both kids for Christmas is contagious!  I wish I could show you the amazing things Callie made for Christmas using our new watercolor pencils but at the risk of tipping off the grandparents, who may read this blog, we are going to keep those under wraps for a few more days!

Instead, I thought I'd share the hostess tags I made for the events we head to for the holidays.  I taught these on two separate occasions but the instructions are the same.  I'm so relieved that the Cheerful Tags Framelits are not retiring yet - they are so versatile and I really enjoy playing with them.  Depending on the paper you paired them with, they'd make a cute homemade touch to a bunco night, a baby shower, a birthday, a bbq, etc.

To start, take a 5 1/2 x 2 3/4 piece of Very Vanilla and run the Bottle Topper tag through the Big Shot with your magnetic platform and cutting mats.  Keep the circle that is punched out - you will use that for your Cheers stamp.  Then careful fold the tag on the score line at the top.  It's easier to work with these if you do that step first.

The first example utilizes the This Christmas DSP cut to 2 1/4 x 1 3/4.  I slipped the ribbon through the slots first (using around 14-18" depending on the ribbon type) and then attached a piece of Early Espresso (1 3/4 x 2 1/4) just adhering the sides so the ribbon slides.  Then I sponged the DSP and added a strip of our Candy Cane Lane Washi tape and attached with adhesive.  Stamp the cheer image from the Here's to Cheers stamp set and mount with dimensionals on a 1 3/8 Red Glimmer Paper circle. That is attached with Tear and Tape.


The other example just uses the Warmth and Cheer DSP instead so I swapped out the satin ribbon for the 5/8 Burlap, switched the ink to Crumb Cake, the cardstock to Cherry Cobbler and the glimmer circle to gold.  This one has a more rustic, drink this wine by the fire, sort of feel!


ORDER ONLINE


To order supplies for these projects, please visit my online store here.  Please use this hostess code when checking out when you find something to order if ordering by December 24th. 
  • December Code:  The code through Christmas is WEEMARQ7.

CURRENT PROMOTIONS


It’s our Year End Closeout Sale – take a look at these great specials!  These include discounts up to 60% on retiring holiday products, clearance items, and high inventory items.  Those placing orders through my Web site will be put into a drawing for a doorprize – hint – it’s something new from the new occasions catalog!


Just a few notes:
  • High inventory items are on discount through January 3rd.
  • Retiring accessories are while supplies last.
  • Retiring items will all discontinue as of January 3rd.
  • Retiring holiday stamp sets are guaranteed through December 21st.

WHAT IS PAPER PUMPKIN?


While we have many great products on closeout, there is one program that you really should check out as well.  I only sell things I'm passionate about and this product line is definitely one of my favorites!

Paper Pumpkin is creativity in a box.  It costs $19.95 plus tax and ships to your mailbox once a month.  It contains everything you need for your own creative escape.  Besides the instructions and pieces for the cards or project, it also contains ink and photopolymer stamps and usually the adhesive you need as well.  My subscribers will also get a project sheet with tips and additional ideas and instructions that they can make with the supplies in the kits and sometimes some supplemental supplies.  They also are invited to participate in a free Paper Pumpkin Playdate to make their kits using any of my additional supplies like framelits and punches!  It's a wonderful program and I'd love for you to try it out!  Sign up by the 10th of the month to get that month's kit!


    JOIN MY TEAM


    If you are interested in joining out team and participating in monthly meetings with free make-n-take projects and outstanding company, contact me today or go here to sign up!  You can get $125 in free merchandise that you choose yourself for only $99 plus tax.  The new Occasion catalog is coming out and you could pre-order from it as a demonstrator!  Contact me today for more information!

    Come back tomorrow for more ideas!

    Have a craftastic day,
    Stacy

    Friday, September 27, 2013

    Joyful Bundle

    The final "joyful" bundle for my holiday camp next weekend revolves around Spreading the Joy and Season of Joy.

    The 3D item is a journal based on the tutorial provided by Cindy Schuster.  I wanted a simple notebook that could be created as a gift for friends easily using any variety of colors and supplies.


    The tag is just done using a scrap of Real Red and embossed with the saying and the corner of the poinsettia.

    The card is based on a card swap I received from Kim B. at Convention (because I'm her favorite).  She did a great technique involving the ink refills and blender pens.  I didn't want to have my customers use that many supplies because I thought it might overwhelm my new stamper so I used sponges after embossing the white cardstock with white embossing powder.  This card is another one I offered from my stamp-a-stack - 10 cards for $15.


    I am no longer accepting RSVPs for my camp or my stamp-a-stacks but if you are interested in being a hostess for the holidays, contact me today and you can do a variety of these projects at your own house with your family and friends!

    Have a craftastic day,
    Stacy

    Thursday, September 26, 2013

    Winter Frost and Festive Flurries Bundle

    The fourth bundle for my holiday camp utilizes the Festive Flurries bundle and more of the Winter Frost DSP pack. 


    When I first got the pack, I was a little disappointed with the patterns in it.  They seemed so busy that I wasn't sure how to play with them.  I realized quickly that they would look good as a background on a card but also as a splash of color in a scrapbooking project. 
     
    The card I made has already been on my blog but it shows how the DSP packs work as a background piece.
     
     
    The tag was also easy - it was just a matter of cutting out the snowflakes to layer them in a way I liked with the scraps I had from the various projects.
     
     
    But what to do for the 3D project?  Sitting on my desk was an exploding scrapbook our little crafting club did this summer for Father's Day and I realized that it could be resized to utilize the papers from the print pack.  Where most of my exploding scrapbook boxes usually measure 9 x 9 or 12 x 12, this one is 7 1/2 x 7 1/2 so each square is only 2 1/2 inches wide.  That let me use the pieces from the DSP pack to add some color and some snowflakes to this project.  The saying from Christmas Messages of Oh What Fun reminded me of watching Callie play in the snow last winter and how great those photos would be in a home décor.


    These boxes are great and it shows how you can easily use your scraps in a fun way.  I've made these for baby showers, Christmas, special events, etc.  With Stampin' Up!'s Simply Scored Tool and plates, these boxes come together quickly and easily!  I think those coming to my camp will really enjoy this project.

    Supplies:
    • Cardstock/Paper: Winter Frost DSP Pack, Smoky Slate, Whisper White, Pool Party
    • Ink:  Smoky Slate
    • Stamps: Festive Flurry, Remembering Christmas, Christmas Messages
    • Accessories:  Festive Flurry Framelits, Frosted Finishes Embellishment, Hexagon Punch, 2 @ 6" pieces of 1/8 Silver Taffeta Ribbon, Basic Rhinestones, Dimensionals, Scissors, and Adhesive
     
    Have a craftastic day,
    Stacy
     

    Thursday, September 19, 2013

    Washi Holiday Camp Bundle

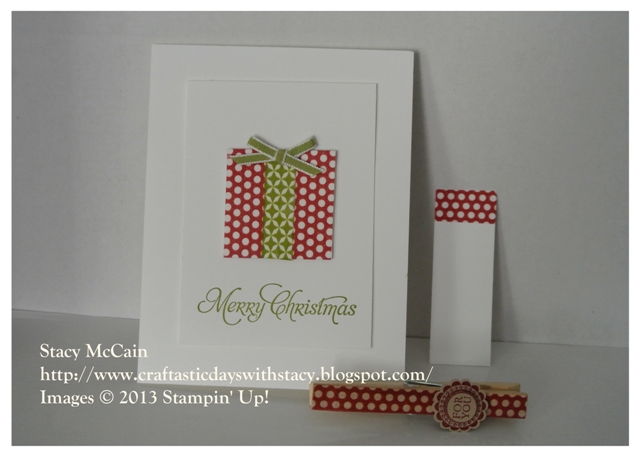
    Welcome back!  Yesterday I shared the washi holiday card that I'm using at my Holiday workshop.  Today I'm showing you the rest of the projects at that "station" during my camp.  This year for the holiday camp, I'm putting a card, tag, and 3D together using the same box of supplies.  This lets my customers know several ways to use the products and lets me get some fun 3D projects in that I don't do the rest of the year.  After all, when it comes to gift giving at Christmas, even packaging makes people smile!


    At the washi station, we will be putting together the card, the clothespin that can either have magnets on it to put on the fridge or it can be put on a package or a bag to hold on the gift tag. I was thinking of all the hostess gifts I will need this winter and this little project is quick and super cute!  Plus it's another one your kiddos could help with. 

    Washi tape is paper tape.  It allows little fingers to rip it and replace it if they don't like where they put it.  Our punches are also kid friendly (as long as you watch so they don't eat their little fingers).  This means the kids can do the punch outs as well!

    As for the tags, washi tape allows you to put a quick accent to a piece of scrap cardstock or paper to add to a gift.  No need to spend money on those sticky tags - just put a piece of washi tape on the end, fill out the to/from, add a dimensional on the bottom, and attach!

    Supplies:
    • Cardstock/DSP: Whisper White, Crumb Cake
    • Ink: Cherry Cobbler, Old Olive
    • Stamp Set: A Round Array, Many Merry Messages
    • Accessories: Season of Style Washi Tape, Clothespin (non-SU), 1/2 Circle Punch, 7/8 Scallop Circle Punch, Old Olive 1/8 Taffeta Ribbon, Glue Dots, Dimensionals, Scissors, and Adhesive.

    Have a craftastic day,
    Stacy