Friday, September 30, 2022

Paper Pumpkin Alternatives - September 2022 - Spooky Treats

This month's Paper Pumpkin is a Halloween delight.  Maybe not so spooky with smiling ghosts but still very fun to make by yourself or with you family and friends. 


The kit came with supplies to make 18 treats - six in three different designs.  The matchbook style boxes hold a lot of treats and will be great for passing out to neighbors or making with your kids.


Since not all of you are fans of the 3D projects, I wanted to show several card options as well.  These boxes can easily be cut apart to make different rectangles to use for card, scrapbook, and decor projects.  I will share my junk journal soon and many of these embellishments are for those pages.


Don't forget that you can pull out old stamp sets and embellishments left over from past Paper Pumpkin kits to celebrate the season.  These little folded mini-books are perfect as cards or to add photos and journaling to a scrapbook page.


Subscribers with me get a PDF with instructions for all these projects and the opportunity to join me for a virtual workshop on the 4th Monday of the month to see tips and tricks for these projects.  During those workshops, I tend to show even more projects than are in the PDF!


You have until the 10th of the month to sign up for kits. The October kit is our holiday card kit, called Ho Ho Ho.  It will include supplies and envelopes to make 9 cards, 3 each of 3 designs.  You can sign up HERE to subscribe for that kit. My alternatives workshop will be Monday, October 24th, at 7pm MST.


October 1st is World Card Making Day!  If you haven't already, please register for the free event Stampin' Up is offering from 2-5pm MST.  You will get an email with a link to login for Saturday and all the dimensions if you want to make their projects. There is going to be a big announcement to those who "attend" and you don't want to miss it!!! (Even if you can't participate tomorrow, register so you can take advantage of the recording and all special offers.)  Sign up HERE.

Have a craftastic day,

Stacy

Tuesday, August 23, 2022

More Sweet Sunflower Alternatives

Today's goal was to clean off the workspace and go back to our July kit and make some alternatives but I couldn't let all these cool pieces go to waste.  These cards were all created using images from the August 2022 Paper Pumpkin kit - Sweet Sunflowers and a few additional products from my craft room.

While I usually keep these types of projects for my subscribers, I am going to include the instructions here so you can have fun playing with your own scraps at home too.

Notecard #1:

  • Cut out a White square using the Stylish Shapes dies.
  • Attach the Poppy Parade flower to it using adhesive.
  • Add to a White notecard using dimensionals.
  • Stamp the sentiment in Poppy Parade and stamp below it – careful to be far enough down the block doesn’t hit the popped-up square.
  • Add a bee with a glue dot.


Notecard #2:
  • Stamp a sunflower and two leaves in Memento Black on a scrap piece of White cardstock.
  • Color using the Blends of choice – I used Mossy Meadow, So Saffron, and Soft Suede.
  • Cut out using your scissors leaving a slight white border.
  • Stamp two twigs in Soft Suede on the lower left as shown.
  • Add the leaves using adhesive.
  • Add the flower using dimensionals.
  • Stamp your sentiment in Soft Suede.


Notecard #3:
  • Stamp a sunflower on a White scrap and cut out.
  • Stamp two sunflowers in Crushed Curry on the front of a Notecard.  
  • Stamp center on all 3 flowers using Soft Suede.
  • Lay template from sunflower dies over the stamped sunflowers and color using a blending brush.
  • Color the sunflower you cut out as well.
  • Stamp twigs and leaves in Soft Suede. 
  • Color the leaves with a green marker if desired.
  • Using your honeycomb, lay it over the notecard and brush in Crushed Curry ink around the card.  You can also use Soft Suede or a combo of both.
  • Add your flower with dimensionals
  • Stamp your sentiment on the card & bees in Soft Suede


Shaker Card:
  • Add all the bees you’d like in a pile on the 8 ½ x 5 ½ Soft Suede card base.
  • Add a window sheet to the honeycomb – about 4 x 5 ¼ - using glue dots or glue strips.
  • Add thin strips of dimensionals to the four edges.
  • Attach to the Soft Suede card base.
  • Ink up the sunflower with Crushed Curry and then wet using the water pen.  Add a little brown to your water if you want to have the vintage look of my sample.
  • Stamp on a 3 x 3 piece of watercolor paper.
  • Ink up the center with Soft Suede and then wet using the water pen.
  • Stamp in the center of the flower.
  • Ink up friend from the stamp and add to the bottom corner.
  • Add some light watercoloring around the flower if desired – mine is watered down Soft Suede.
  • Add the label from the kit in the upper left.
  • Add to the front of the card using tear and tape adhesive.
  • Add a loose bee somewhere to the card on the outside with a glue dot.


I hope you enjoyed these alternative ideas and that you are inspired to play with your kits every month.

Have a craftastic day,
Stacy


Paper Pumpkin Envelope and Card Bag

Below are step by step instructions for how to make a bag out of a card and envelope.  While I still like buying bags and decorating them with hanging tags, I do appreciate that this is a way to leverage those beautiful watercolor envelopes that I can't bear to mail from the August 2022 Sweet Sunflowers Paper Pumpkin kit.


I only had the green card left so I used it but you could use normal cardstock with the beautiful water-colored envelope as well if you didn't get this kit or are out of pieces.  I chose to clip mine at the end with a binder clip instead of adding a handle – I just didn’t think the bottom was sturdy enough for something that needed handles but you could include a ribbon handle with the aid of brads or staples.  

The bags dimensions are 4 ¼ x 5 ½ x 1 ½ and would work best for a set of notecards and envelopes or a light-weight gift.

First, the cuts.....


Card Cuts:

  • Cut in half at the score line so you have two 5 ½ x 4 ¼ pieces.

Envelope Cuts:

  • Line up the envelope so the bottom is at 4” and cut.  
  • Turn the envelope 90 degrees so the opening is at the top.
  • Cut 1/8 inch off the side, turn 180 degrees, and cut another 1/8 off the other side – now it’s 5 1/2”.
  • Open the card up and cut at the score line.
  • Cut the largest piece in half to make two 5 ½ x 2 pieces (these are the sides)
  • Score the sides each at ¼”, 1”, and 1 ¾”.  
  • With the pattern facing up, fold the pieces in half at the 1” mark and then fold back the ¼ lines and set aside.
  • Align the bottom of the other envelope piece on the 3” mark and cut off the rounded area (this is the bottom)
  • Score the 3” side at ¾, 1 ½, and 2 ¼.
  • Score the 5 1/2” side at 5/8 & 4 7/8.
  • Cut off the four corners. 
  • With the white facing up, fold in half.  Open up and then fold the four sides in at the other score lines.

Now the assembly:

  • Put adhesive on the left and right sides of the back of the first cut card.  
    • Use either Tear and Tape, glue strips, or tombo adhesive. 
  • Attach the sides to the card front at that ¼ score line – make sure the patterns are going the right way on the card front and sides!
  • For the bottom, add Tear and Tape to the four printed sides of the envelope paper.
  • Peel the first piece and adhere to the inside of the box from edge to edge.
  • Next peel the two short sides of the bottom and attach to the sides.
  • Peel the tape from the last flap and attach the card front to the bottom.
  • Add adhesive to the remaining ¼ tabs and attach to the card front.  
  • Embellish the front of your bag.

Notes:

You can add ribbon – just do it before you embellish the front.  You can attach it with staples or brads and cover it with your embellishments.

Here are a few visuals to help if needed.....


At this point, you are probably thinking a video would have been easier and you would have been correct.  But those are skills to work on for another day.

Come back tomorrow to see what I was working on before bag-a-palooza.

Have a craftastic day,
Stacy

Monday, August 22, 2022

Paper Pumpkin Alternatives - August 2022 - Sweet Sunflowers

The kids are back in school and creativity is in the air.  Sometimes self care just means being by yourself for a few hours.  But, if you are looking for an experience that allows you to be creative and helps you reach out to others with homemade cards and messages, Paper Pumpkin may be the perfect program for you!

Below are my alternatives featuring the August 2022 Paper Pumpkin kit titled "Sweet Sunflowers."  This kit came with supplies to make 9 cards with water-colored imagery on the cards and envelopes.  It also included instructions, adhesive, an exclusive sunflower stamp set, Crushed Curry & Soft Suede ink spots, and a bonus gift of gold foil honeycombs.  First time subscribers get a free clear block in their kit as well. This monthly kit costs around $25 after shipping and sales tax depending on your area.


Aren't the cards in this kit beautiful?  It's actually harder for me to make alternatives when I like the original cards so much so I stuck to different techniques you can do with the sunflowers and how to manipulate the cards and envelopes to make even more creations.

As for these samples, those that subscribe with me can attend a virtual workshop walking through how these cards were made and tips and tricks to maximizing your kit.  My subscribers also get a PDF with step by step instructions for all the cards shown below.  Which one is your favorite?

These first cards all involve cutting up the card bases from the included cards.  I added in some sayings from past kits.  I think these make great Get Well and Sympathy cards as well.


This section all include a piece of the envelope cut up.  The envelopes with this kit were true art but they were too pretty to not work with.


Finally, I was inspired by a fellow demonstrator, Jennifer Taylor, who showed me a card layout I'd never seen.  These 11 x 2 1/4 cards allow you to really focus on a central point.  Plus the recipient to cut them at the score line, keep the nice message written inside, and mount on a standard 8 1/2 x 5 1/2 card of their own to send to someone else.


Finally, this month's kit came with an alternative included.  I didn't want to use all my die cut sunflowers on it so I realized I could stamp the sunflower and use a blending brush to color them in.  The card is stunning - I'm glad I was inspired by SU!'s idea!


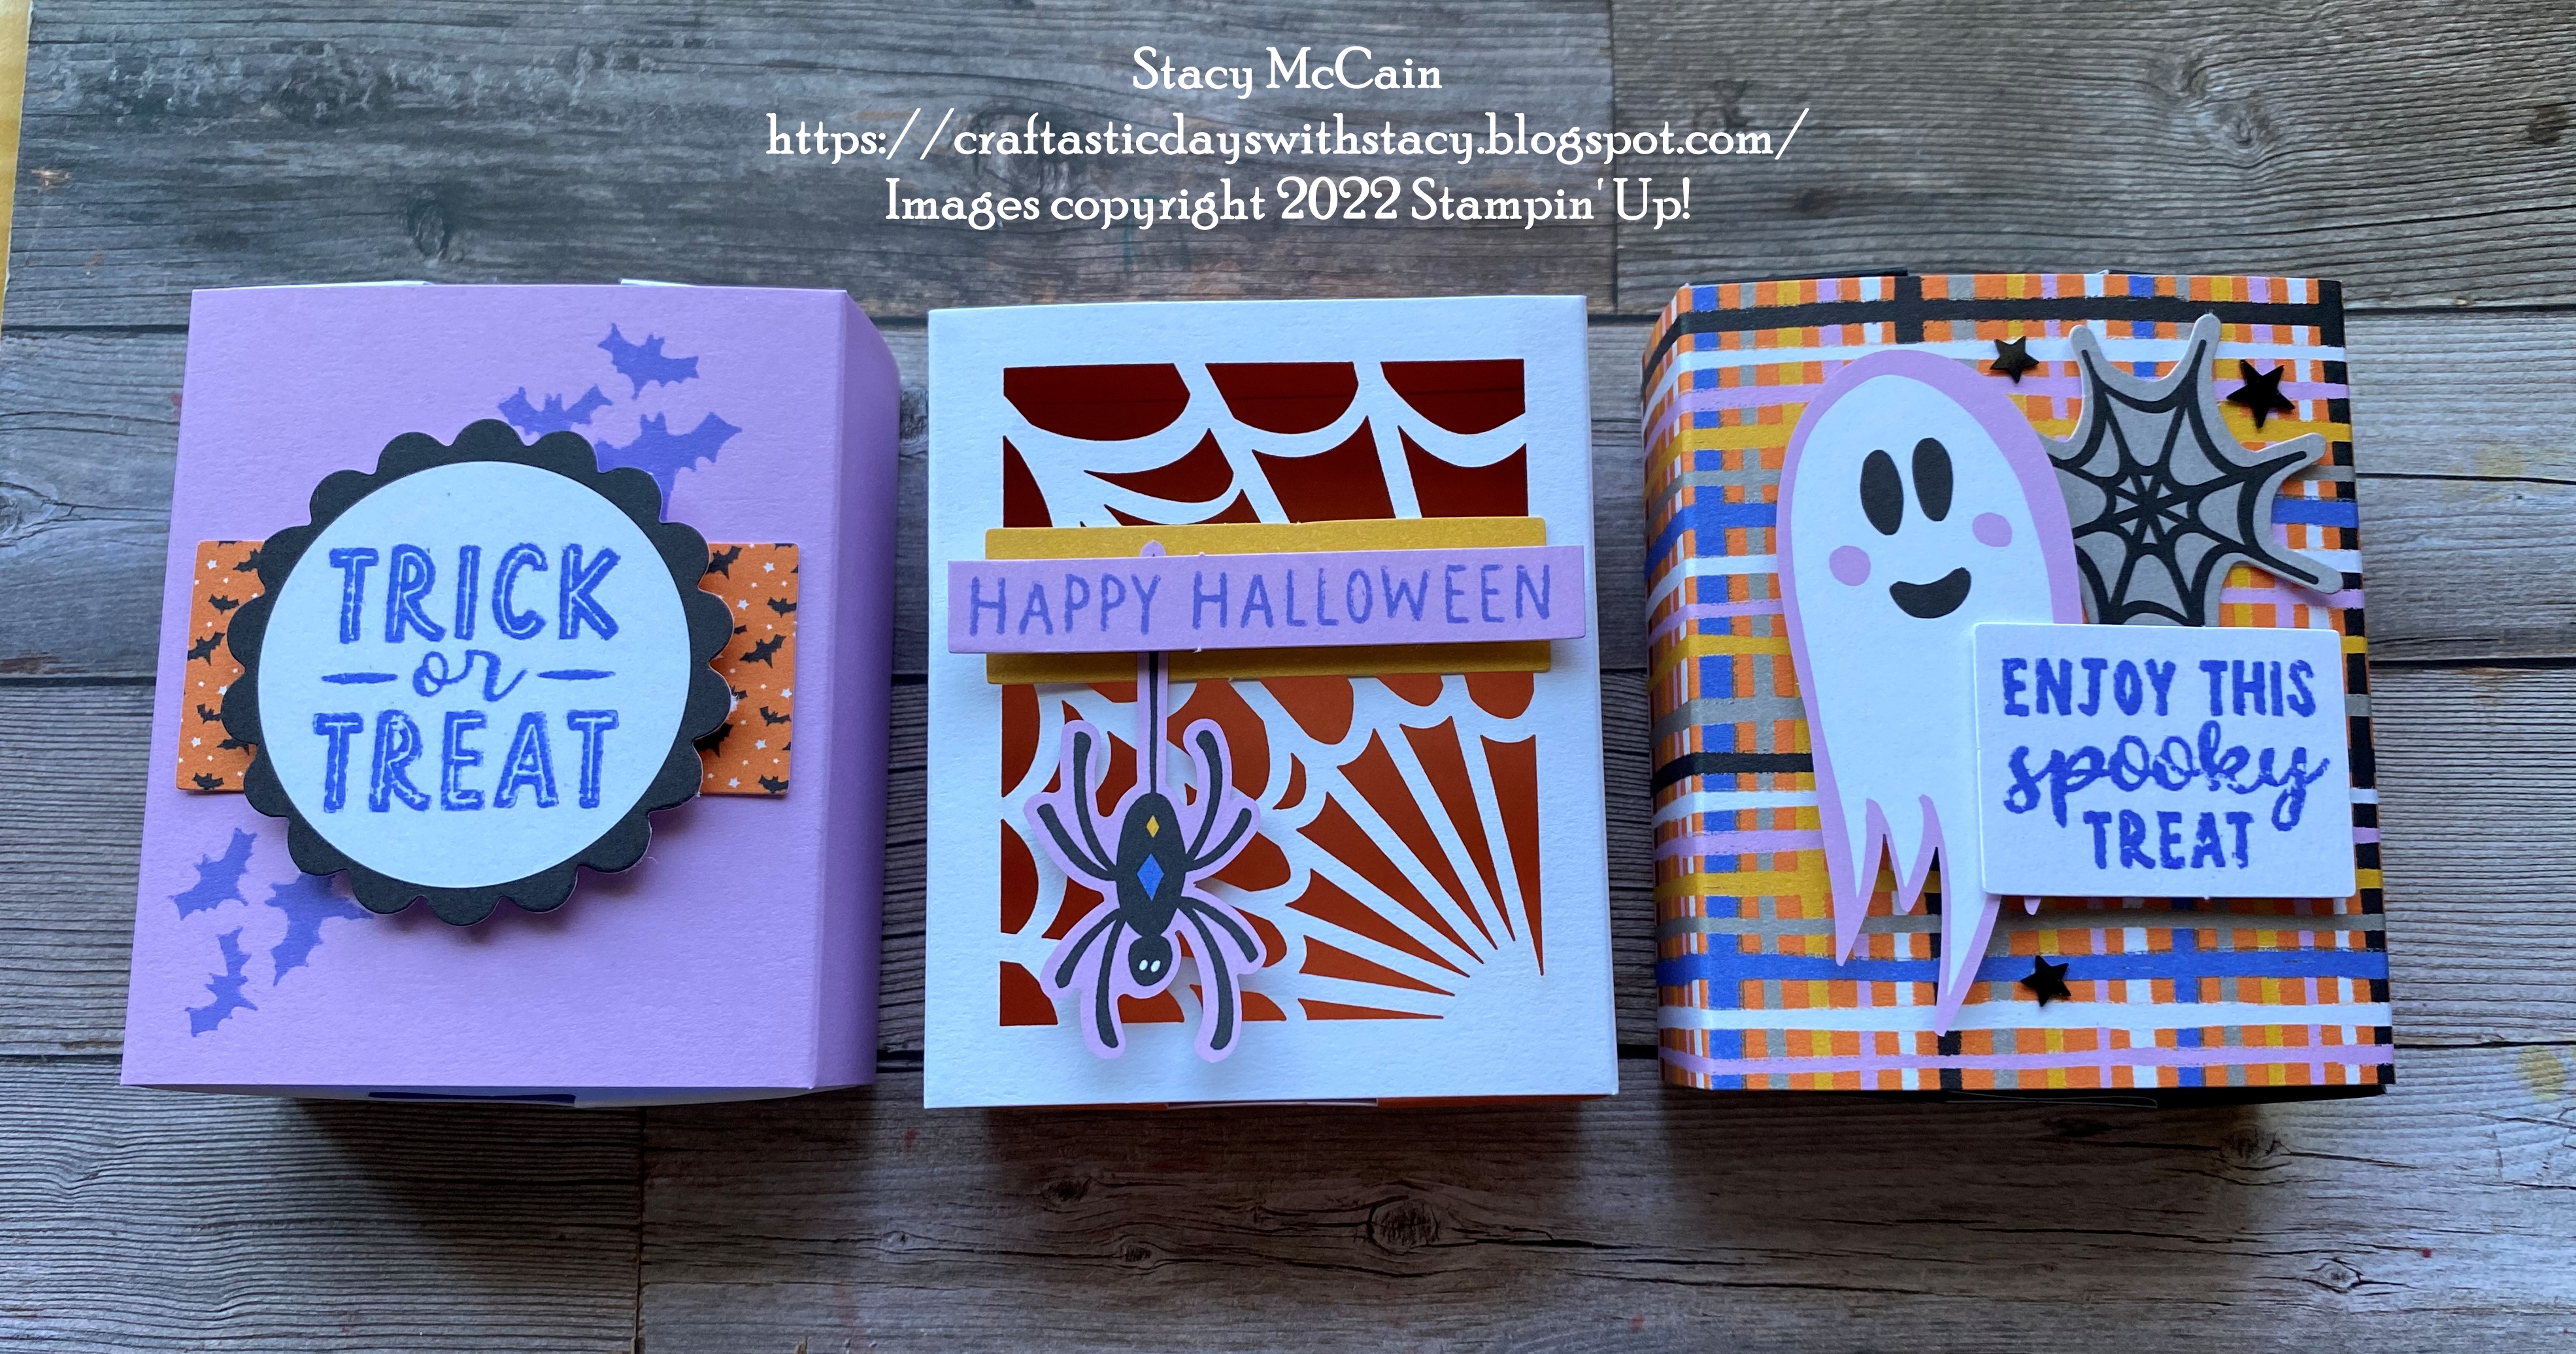
If you are looking for a creative experience that allows you to have some time to your self or with other creative people in your world and don't already have a demonstrator, I hope you will consider subscribing with me for a future month. While this kit is no longer available, you can still subscribe by September 10th to get the Spooky Treats kit which includes 3 designs of treat boxes and then holiday stamping comes in October and November.

Sign up here: https://www.paperpumpkin.com/en-us/sign-up/?demoid=80380

Have a craftastic day,

Stacy

Sunday, July 3, 2022

Paper Pumpkin Alternatives - June 2022 - Pick of the Crop

June has flown by and there were many great family moments for our crew. So I'm just getting my alternatives out but they were sure fun to make.


This month's Paper Pumpkin kit, Pick of the Crop, included supplies to make 9 cards, 3 each of these designs.  The stamp set also has a lot of versatile sayings that go with past fruit and vegetable papers.


The kit also included a Calypso Coral ink spot and first time subscribers received a clear size D block like always.

Here are my alternatives.  I used a few extra supplies for my creations and also cut up envelopes and one of the cardfronts.  

  • Lots of Pun stamp set (December 2021 Paper Pumpkin)
  • Cardstock: Blackberry Bliss, Soft Succulent, Cajun Craze, Basic White
  • Inks: Blackberry Bliss, Memento Black, Night of Navy
  • Tools: Blending Brush, Adhesive, Scissors

All of my subscribers get a PDF with step by step instructions on how to make these projects as well as a virtual session to go through them and answer questions.


If you are interested in joining us for next month, you can subscribe HERE.


Next month's kit will have 9 cards, again 3 each of 3 designs, and is called Sending Good Thoughts.  It will come with a Bermuda Bay ink spot, exclusive nautical themed stamp set, and all the pieces you need plus instructions.  Sign up by July 10th to get this great kit!

If you are interested in joining us for next month, you can subscribe HERE.

Have a craftastic day,

Stacy