Thursday, August 27, 2015

A New "Go To" Layout - Bohemian Style

I wanted to share the other beautiful card my mom made for me to sell me on the Bohemian suite of projects!  I am a big fan of this layout and it was inspired by the great sample on page 96 of the Annual Catalog.  I challenge you to find either washi tape or DSP that works for a card like this and try it out!


Supplies:
  • Cardstock/DSP: Very Vanilla, Blackberry Bliss, Bermuda Bay, Bohemian DSP
  • Ink: Bermuda Bay
  • Stamp Sets: You've Got This
  • Accessories: Gold Metallic Thread, Itty Bitty Accents Punch Pack, Basic Pearls, 2" Circle Punch, Scissors, Dimensionals, and Adhesive
 
Check out this week's great deals via my online store and use 7RUSMFHU upon checkout!
 

While the glitter paper keeps you from making a mess, the silver glitter would help make a beautiful mess while adding some bling to your holiday projects as well!


Have you been considering signing up for Paper Pumpkin?  Now is the time.  For only $9.98 plus tax, you will get a kit sent to your door for the next two months that contains stamps, ink, instructions, and supplies to make great cards and projects -- if you are a new subscriber.  The kit comes in your mailbox and is designed for beginner or experienced stampers.  I maintain a Paper Pumpkin board on Pinterest full of ideas using the stamps from the kit so you have easy access to a plethora of amazing ideas from other incredible ink artists. While we usually don't know what is in the kits, we were able to see September at Convention and it will help you bring in the fall season and all it brings with it!   You can still sign up to get September and October at a discount but this deal only lasts until September 10th!.  To sign up, visit: https://mypaperpumpkin.com/en/?demoid=80380 and enter promo code HALFOFF.
 
 
Have a craftastic day,
Stacy

Wednesday, August 26, 2015

Bohemian Beauty

Today's card is another from my wonderful mom Cris who is also a great demonstrator.  So many talents in life.  :) 

Sometimes I'm asked why Stampin' Up! needs demonstrators instead of selling like a retail store.  This is a great example. I buy products from other companies but often they sit on my shelf waiting for inspiration to it.  Demonstrators bring inspiration to your doorstep (or to your kitchen table in most cases!)  They show you things you can do with product that either you hadn't thought of or wanted to see before you committed on a purchase. 

This card is one such example for me.  I did not like this paper.  We work hard in our house to not say "hate" but that's what I thought of when I saw it.  My mom?  Well, she loved it.  So I asked her to make me some samples with it that would change my mind.  Boy did she respond!  Isn't this card bright and beautiful?  By combining the embossing folder with the diamond pattern, she made it easier on the eye while still keeping the texture.  The ribbon layering brings out the other colors in the paper besides the bright turquoise.  I think it's truly a wonderful card.

 
Supplies:
  • Cardstock/DSP: Bermuda Bay, Rich Razzleberry, Bohemian Designer Series Paper
  • Ink: Bermuda Bay
  • Stamp Sets: You've Got This
  • Accessories: Big Shot & Cutting Mats, Boho Chic TIEF, Delightful Dijon 1" Dotted Lace Trim; Rich Razzleberry Cotton Ribbon, Scissors, Dimensionals, and Adhesive
 
 
Check out this week's great deals via my online store and use 7RUSMFHU upon checkout!
 
While the glitter paper keeps you from making a mess, the silver glitter would help make a beautiful mess while adding some bling to your holiday projects as well!
 
 
Have you been considering signing up for Paper Pumpkin?  Now is the time.  For only $9.98 plus tax, you will get a kit sent to your door for the next two months that contains stamps, ink, instructions, and supplies to make great cards and projects -- if you are a new subscriber.  The kit comes in your mailbox and is designed for beginner or experienced stampers.  I maintain a Paper Pumpkin board on Pinterest full of ideas using the stamps from the kit so you have easy access to a plethora of amazing ideas from other incredible ink artists. While we usually don't know what is in the kits, we were able to see September at Convention and it will help you bring in the fall season and all it brings with it!   You can still sign up to get September and October at a discount but this deal only lasts until September 10th!.  To sign up, visit: https://mypaperpumpkin.com/en/?demoid=80380 and enter promo code HALFOFF.
 
 
Have a craftastic day,
Stacy

Tuesday, August 25, 2015

Spreading her Wings - Like Mother, like Daughter

Yesterday was a big day at our house - Calliekins started KINDERGARTEN!  It was a great day and we are entering a whole new era of scrapbooking moments in our house.  I can't wait for this weekend so I can break out the book and my Seasonal Snapshot 2015 kit and start putting together the pages! 
 
Seeing her spread her wings and try something new was inspiring.  We often remember that we are inspiring our children but it's a great moment when we remember they inspire us even more.  I wanted to share something today that reminded me of Callie and butterflies did the trick.
 
Today's cards were again designed by mom, who inspires me every day!  I love the combo of the Watercolor Wings with the Butterflies Thinlits dies.  The English Garden DSP finishes this off beautifully!  I am completely and utterly in LOVE with our Designer Series Papers (DSP) this year!  Plus, the sentiment with this set "The little moments with you matter a lot to me" sums up my feelings about my family every day!
 

Supplies:
  • Cardstock/DSP: Whisper White, English Garden DSP, Hello Honey (card 1), Night of Navy (card 2)
  • Ink: Hello Honey, Soft Suede, Mossy Meadow (card 1), Night of Navy (card 2)
  • Stamp Set: Watercolor Wings
  • Accessories: Doily, Gold Metallic Thread (card 1), Night of Navy Seam Binding (card 2), Basic Rhinestones (card 2), Dimensionals, Scissors, and Adhesive
 
 
Check out this week's great deals via my online store and use 7RUSMFHU upon checkout!
 
That gold glimmer paper is a fun way to add a little sparkle to your holiday projects without a big mess!
 
 
Have you been considering signing up for Paper Pumpkin?  Now is the time.  For only $9.98 plus tax, you will get a kit sent to your door for the next two months that contains stamps, ink, instructions, and supplies to make great cards and projects.  The kit comes in your mailbox and is designed for beginner or experienced stampers.  I maintain a Paper Pumpkin board on Pinterest full of ideas using the stamps from the kit so you have easy access to a plethora of amazing ideas from other incredible ink artists. While we usually don't know what is in the kits, we were able to see September at Convention and it will help you bring in the fall season and all it brings with it!   You can still sign up to get September and October at a discount but this deal only lasts until September 10th!.  To sign up, visit: https://mypaperpumpkin.com/en/?demoid=80380 and enter promo code HALFOFF.
 
 
Have a craftastic day,
Stacy

Monday, August 24, 2015

Halloween Mommy & Me Class

I love crafting with Callie and Halloween is one of my favorite holidays to make décor.  I seem to miss Halloween crafting each year so I'm excited to have an adult class (posted here) and this kids class on my calendar!  This year I started to pilot some mommy (or daddy) and me classes since so many of her friends loved to make things too.

This October's class is all about Halloween.  The kids will be making three projects in an hour that let them be creative and give them a little candy to take home (which is probably Callie's favorite part of the class!)  They will be painting a spider jar with a great web coaster, a goodie bag filled with candy, and a treat bag perfect for a fruit snack or peanut butter cup.  The class is designed for 4-7 year olds but even older kids might enjoy making these projects with their parents!


The class costs $10 for one child or $15 for siblings and is taking place on October 4th from 1-2pm at my house in Boise, ID.  Cost includes the supplies for the projects, candy, and adhesive.  Leave me a comment if you are interested in attending or send me an email.

I just have to say that this jar turned out adorable and I cannot wait to see all the variations that come out of the class!


There are several sneak peek items on these projects that are marked below with "new!"

Supplies:
  • Cardstock/DSP:  Tangelo Twist, Very Vanilla, Basic Black, Happy Hauntings DSP (new!)
  • Ink: Memento Tuxedo Black, Tangelo Twist
  • Stamp Sets: A Little Something (new!), Cheer All Year (new!)
  • Accessories: Glue Dots, Spider Web Doilies (new!), Happy Haunting Designer Washi Tape (new!), Tear and Tape, Handheld Stapler, Artisan Label Punch (retired), Clothespins, Scissors, Banner Punch, 1" Circle Punch, Dimensionals
  • Non-SU Accessories: Black Paint, Pint Mason Jars, Googly Eyes, Sponge Brush, CANDY

The class is using the Label Bracket punch on the treat bag since I forgot to move the Artisan Label punch to the retired stack!

Have a craftastic day,
Stacy

Saturday, August 22, 2015

Halloween Happiness Sneak Peek

I love Halloween.  Since having children, Halloween is more about family friendly activities and less about big parties and themes.  But I still love the idea of a good decoration or goodie bag and I'm so excited to have enough customers who love the holiday as much as I do.

The following class is set for September 26th.  For $30, you will get the supplies to do the hat décor item, a goodie bag filled with M&Ms, a Halloween card and a Thank You card all using components from the Witching Décor Project kit and the Witches' Night stamp set!

 
The décor item alone is amazing and will bring a wicked homemade centerpiece to your table!
 
 
This card uses another stamp from the stamp set and the twine that you cut off the burlap when doing the hat, along with a spare Crumb Cake leaf.


This tag is all from the components in the kit.  You will stamp it in Memento Tuxedo Black ink on two small tags and cut out the raven from one of them.  Layer with dimensionals, along with the "31" die cut.  I added a small piece of Basic Black Baker's Twine to tie the tag to the gusseted goodie bag.


Finally, for the Halloween card I wanted to use as many pieces leftover from the hat kit as possible.  In this case, it's a Very Vanilla card that uses the 2nd spider doily and the other stamps in the stamp set.  I also used some of the extra die cut pieces. 


Supplies:
  • Kit: Witching Décor Project Kit
  • Cardstock: Very Vanilla
  • Ink: Soft Suede & Memento Tuxedo Black
  • Stamp Set: Witches' Night & One Big Meaning
  • Accessories:  Sponge, Scissors, Tear & Tape, Adhesive, Dimensionals, Basic Black Bakers Twine, Handheld Punch, Glue Dots
Contact me today to RSVP for this class!
 
Have a craftastic day,
Stacy

Friday, August 21, 2015

Paper Pumpkin - Chalk it up to Love - Boxes & Tips

Today I'm sharing my box samples from the August 2015 Paper Pumpkin kit called Chalk it up to Love.  I also discovered a few tips while creating these samples and yesterday's card samples that I'd like to share.


Tips:
  • When curling the flowers, it says to use a pencil.  I recommend using a bone folder as you get a little broader of a curl and it's the entire petal and not just the end.
  • When using the fringe, I recommend not curling it until it's already rolled.  The directions have you folding it into the curls and that was hard for me.
  • If you think the fringe in the center is too tall, cut it down to 3/4" using your paper cutter.  Make sure you aren't cutting off the solid strip when you cut it down you will have confetti and no flower center.
  • Before rolling your fringe, carefully curl it on the solid strip at the bottom.  Be careful not to tear this.  It will help you roll it more evenly.
  • Remember to let the craft ink dry.  It doesn't take long but it is a shame if it smears.  I recommend stamping and then setting aside while you assemble the rest of the pieces.
Boxes:

Box 1: This is like the sample in the instructions.  I attached the ribbon with the sticky strip included in the kit and layered the accents with dimensionals so that the ribbon and the flower and tag just slide off to open the box.


Box 2: I love this one!  Because I was experimenting with using the flowers on cards (shown yesterday) and using the fringe scissors on them (won't be showing and do NOT recommend doing....), I was left with a single flower.  I mentioned yesterday that I cut one of the ribbon cards in half.  I used part of the leftover scraps to  make the flower center and the strip on the card, both of which are layered using dimensionals. Then I used the other part of the tag (used on yesterday's With Love gold card) and stamped for you. 


Box 3: This one is a normal flower like in the instructions but I used another scrap of the chalkboard tag to stamp For You and cut the banner ends. Then it's ticked into the flower using a dimensional.


I plan to use these for gift cards for upcoming weddings and birthdays - they will fit perfectly inside the box and you can either insert a note in the box or you can write on the tag using our awesome chalk markers!

For tips on how to assemble the boxes, please watch the YouTube video posted by Stampin' Up!: https://www.youtube.com/watch?v=FQCr0Aqinfk

 
Check out this week's great deals via my online store and use V3JMFJWP upon checkout!
 

That Basic Black Baker's Twine is great for Halloween goodie bags!


Have you been considering signing up for Paper Pumpkin?  Now is the time.  For only $9.98 plus tax, you will get a kit sent to your door for the next two months that contains stamps, ink, instructions, and supplies to make great cards and projects.  The kit comes in your mailbox and is designed for beginner or experienced stampers.  I maintain a Paper Pumpkin board on Pinterest full of ideas using the stamps from the kit so you have easy access to a plethora of amazing ideas from other incredible ink artists. While we usually don't know what is in the kits, we were able to see this one at Convention.   The deadline for the August kit has passed, but you can still sign up to get September and October at a discount.  To sign up, visit: https://mypaperpumpkin.com/en/?demoid=80380.
 
Have a craftastic day,
Stacy

Thursday, August 20, 2015

Paper Pumpkin - Chalk it up to Love Card Samples


My Paper Pumpkin box was waiting for me, along with my holiday catalog pre-order, when I got home from vacation on Sunday.  I was more excited to play with my little red box than I was to play with my holiday supplies and it turned out that I needed what was in there! 
 
Our friend group took a few hits when we were on vacation and one grandfather and three grandmothers passed away in the span of that week  While I never look forward to making or mailing a sympathy card, I knew that there was a simple and elegant sympathy stamp in our kit this month and that I could design something that I could use to send my condolences.
 
Today I will post the cards and tomorrow I'll post the boxes and a few tips for this kit!  If you are local and a subscriber of mine for Paper Pumpkin, you should come to the open house on August 29th between 10-6pm to do this kit and any others you are behind on.  I'll have out my punches and such to help you create while eating a pumpkin treat!


Card 1: I created a 8 1/2 x 5 1/2 card base out of Thick Whisper White.  I stamped the tag and sponge the tag and attached it with adhesive.  I used one of the flowers and curled the edges with a bone folder and layered with a dimensional..  Then I stamped the circle on a piece of black paper and punched out using the 1 3/8 punch.  I sponged it and attached with a dimensional. 
 

Card 2:  For this one, I layered the Vanilla tag on the gold striped card.  I stamped just the "love" from "with love" and stamped in the center.  I stamped the flourish and then put a medium pearl in the center of each.  Then I attached it to the card using adhesive.


Card 3: For this one, I layered the Vanilla tag on the card using dimensionals.  Then I BENT the long flourish so that it would stamp in a curve (cool perk of using photopolymer stamps) and stamped it on the tag.  It's layered with dimensionals after I sponged it. Then I took one of the spare tags (with the straight edges) and cut off a strip.  I stamped With Love on it and inked it and then cut it into a rectangle.  It's also sponged and layered with dimensionals.    A great wedding card!


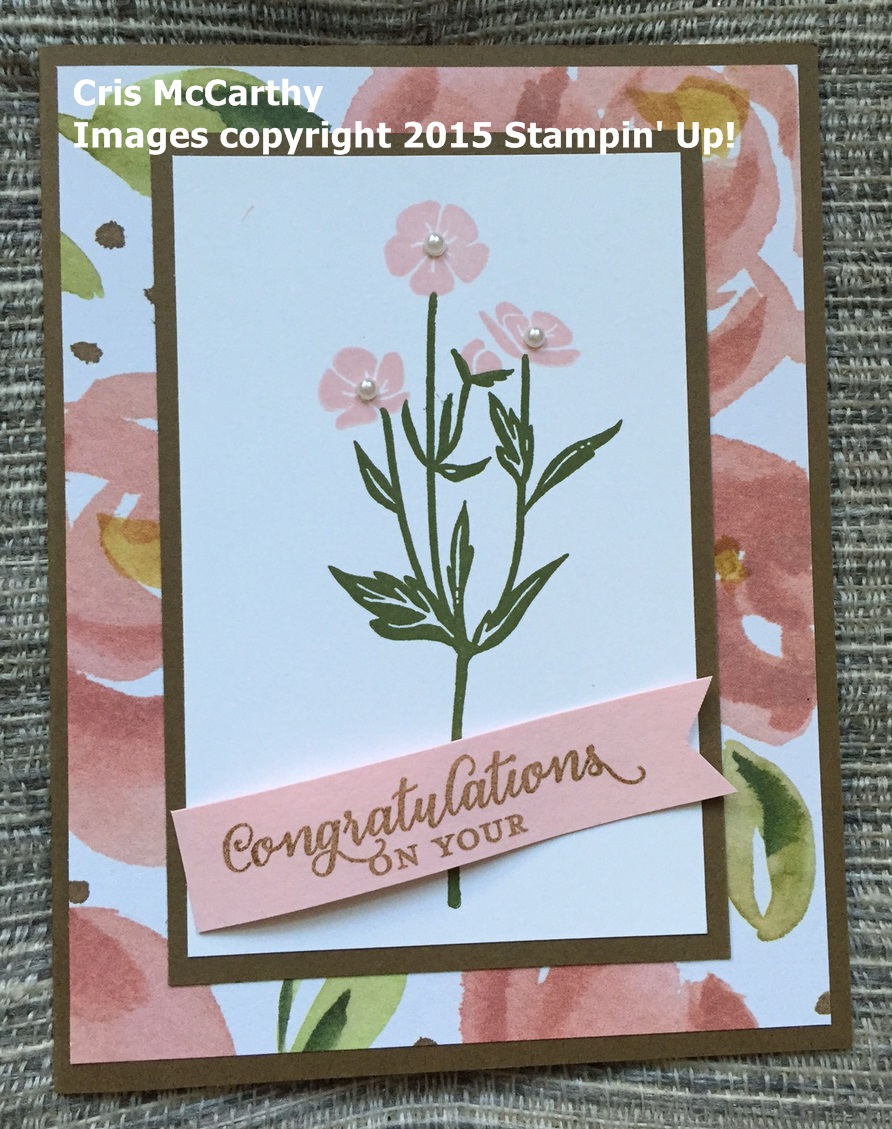
Card 4:  I made two of these.  The pink banner is layered on the card using adhesive.  Then I stamped the saying on the tag and sponged it.  It's layered on the card with dimensionals.  Then I used the cardstock left over from the flower die cuts and punched two pink flowers using the Petite Petals Punch and the Itty Bitty Accents Punch Pack and curled them with the bone folder.  They are layered with a glue dot and added to the card using the dimensionals.  I also added a white accent to the center because I love them.


Card 5:  I cut one of the bow cards in half and mounted it on a Very Vanilla love note.  I then stamped the tag and layered it on the card using dimensionals.  I punched out the 1 3/8 circle from the leftover pink paper in the kit and created another layered flower using Very Vanilla and pearls.


Card 6: This is another version of the sympathy card only done on a Whisper White love note.  The flower has a pink small flower from the leftover pink paper and the white flower is actually punched out of the strip of bow paper that I had left over but turned over!  Another white accents makes an appearance in the flower.


Card 7: This card has the vanilla tag curled with the bone folder and mounted to the card using adhesive.  Then the is a flourish of gold metallic thread behind the sentiment and the tag is lifted using dimensionals.

I hope you enjoyed these samples - leave me a comment on which one is your favorite!  For ideas on how to stamp different sayings on the tags using this stamp set, please watch the YouTube video posted by Stampin' Up!: https://www.youtube.com/watch?v=FQCr0Aqinfk


Check out this week's great deals via my online store and use V3JMFJWP upon checkout!
 

That gold satin ribbon would be wonderful on your holiday cards!


Have you been considering signing up for Paper Pumpkin?  Now is the time.  For only $9.98 plus tax, you will get a kit sent to your door for the next two months that contains stamps, ink, instructions, and supplies to make great cards and projects.  The kit comes in your mailbox and is designed for beginner or experienced stampers.  I maintain a Paper Pumpkin board on Pinterest full of ideas using the stamps from the kit so you have easy access to a plethora of amazing ideas from other incredible ink artists. While we usually don't know what is in the kits, we were able to see this one at Convention.   The deadline for the August kit has passed, but you can still sign up to get September and October at a discount.  To sign up, visit: https://mypaperpumpkin.com/en/?demoid=80380.
 
Have a craftastic day,
Stacy

Wednesday, August 19, 2015

Stampin' with my Mom - Wild About Flowers

This week I'm featuring projects by my mom.  She's a demonstrator as well but doesn't like to blog post so I wanted to share some of her creations with you!  Tomorrow I will be posting my projects using the August Paper Pumpkin kit that you won't want to miss and then I will share more of mom's creations!

Today's card features the Wild About Flowers stamp set and the gorgeous English Garden DSP. 


Supplies:

  • Cardstock/DSP: Hello Honey & Delightful Dijon (card 1), Soft Suede & Blushing Bride (card 2), Whisper White, English Garden DSP
  • Ink: Delightful Dijon & Hello Honey (card 1) or Soft Suede & Blushing Bride (card 2), Mossy Meadow (both cards)
  • Stamp Set: Wild About Flowers
  • Accessories:  Basic Pearls, Triple Banner Punch, Bone Folder, Dimensionals, and Adhesive
This stamp set may have a lot of flowers but the sentiments in it are very versatile for both genders celebrating their newest adventures.
 

Check it out HERE.


Check out this week's great deals via my online store and use V3JMFJWP upon checkout!
 

That gold satin ribbon would be wonderful on your holiday cards!


Have you been considering signing up for Paper Pumpkin?  Now is the time.  For only $9.98 plus tax, you will get a kit sent to your door for the next two months that contains stamps, ink, instructions, and supplies to make great cards and projects.  The kit comes in your mailbox and is designed for beginner or experienced stampers.  I maintain a Paper Pumpkin board on Pinterest full of ideas using the stamps from the kit so you have easy access to a plethora of amazing ideas from other incredible ink artists. While we usually don't know what is in the kits, we were able to see this one at Convention.   The deadline for the August kit has passed, but you can still sign up to get September and October at a discount.  To sign up, visit: https://mypaperpumpkin.com/en/?demoid=80380.
 
Have a craftastic day,
Stacy

Monday, August 17, 2015

Stampin' with my Mom - Butterfly Basics

This week I'm featuring projects by my mom.  She's an amazing artist, creative demonstrator, and the source of my inspiration in so many ways.

Today's card features the Butterfly Basics stamp set and the beautiful Timeless Elegance DSP.  This card is one of my favorites of hers and also from all I got at Convention.  What a great use of scraps and a single tone of ink!

 
Supplies:

  • Cardstock/DSP: Very Vanilla, Basic Black, & Timeless Elegance DSP
  • Ink: Memento Tuxedo Black
  • Stamp Set: Butterfly Basics
  • Accessories: Basic Pearls, Bitty Butterfly Punch, Scissors, Glue Dots, and Adhesive
 
 
Check out this week's great deals via my online store and use V3JMFJWP upon checkout!


So much great stuff to play with!  Use that Wild Wasabi Seam Binding Ribbon for Christmas Cards with our new winter embellishments coming up in the holiday catalog!

Have you been considering signing up for Paper Pumpkin?  Now is the time.  For only $9.98 plus tax, you will get a kit sent to your door for the next two months that contains stamps, ink, instructions, and supplies to make great cards and projects.  The kit comes in your mailbox and is designed for beginner or experienced stampers.  I maintain a Paper Pumpkin board on Pinterest full of ideas using the stamps from the kit so you have easy access to a plethora of amazing ideas from other incredible ink artists. While we usually don't know what is in the kits, we were able to see this one at Convention.   The deadline for the August kit has passed, but you can still sign up to get September and October at a discount.  To sign up, visit: https://mypaperpumpkin.com/en/?demoid=80380.
 
Have a craftastic day,
Stacy

Sunday, August 16, 2015

Friendly Wishes - Dearest Friends

Spending time with the family this week so this is a sample is from the Creative Convention Online I attended a few months back.  This card was designed by Carol Hickman.
 
 
Supplies:
  • Cardstock: Cucumber Crush, Whisper White, Watermelon Wonder, Color Me Irresistible DSP
  • Ink: Memento Tuxedo Black
  • Stamp Set: Friendly Wishes
  • Accessories: Lots of Labels Framelits, Big Shot & Cutting Mats, 2015-2017 In Color Markers, White Satin Ribbon, Dimensionals, and Adhesive
 
Check out this week's great deals via my online store and use V3JMFJWP upon checkout!


So much great stuff to play with!  Use that Wild Wasabi Seam Binding Ribbon for Christmas Cards with our new winter embellishments coming up in the holiday catalog!


Have you been considering signing up for Paper Pumpkin?  Now is the time.  For only $9.98 plus tax, you will get a kit sent to your door for the next two months that contains stamps, ink, instructions, and supplies to make great cards and projects.  The kit comes in your mailbox and is designed for beginner or experienced stampers.  I maintain a Paper Pumpkin board on Pinterest full of ideas using the stamps from the kit so you have easy access to a plethora of amazing ideas from other incredible ink artists. While we usually don't know what is in the kits, we were able to see this one at Convention.   The deadline for the August kit has passed, but you can still sign up to get September and October at a discount.  To sign up, visit: https://mypaperpumpkin.com/en/?demoid=80380.

Have a craftastic day,
Stacy