Tuesday, May 6, 2014

April Paper Pumpkin - Mother of a Kit

A few years ago there was a recruiting special announced at Convention where demonstrators could get a Halloween packet and frame.  I was convinced that Stampin' Up! was going to come out with a frame line to help with our home décor crafts.  I was wrong and it became a joke between me and my fellow Idaho demonstrators.  April's kit re-ignited that idea with the cute frameable art project, though I know that there still aren't frames in the newest catalog either.

The kit came with a frame and cover and was designed to be a gift.  I'm so keeping mine.  It also came with two big hearts and heart outlines, two banners, 14 little hearts, twine, cotton ribbon, some faceted buttons, and 2 ink spots for Pistachio Pudding and Coastal Cabana.

The first picture is the kit as designed in the instructions.


I decided I'd like to put a picture of my two little cuddlebugs so I used the big heart as a template and cut out a wallet photo of Callie and Michael.


The Happy Mother's Day stamp was too cute to not use for a card for my mom or mother in law so I used the leftover pieces and a little Very Vanilla and Pistachio Pudding cardstock to put this together.  I also used the new Project Life corner rounder on the upper right corner since I needed something up in that space.


Finally, I did a cute little love note to go with another Mom's day gift.  I created a loop on the small piece of Cotton ribbon I had left over and wrapped it in twine.  Then I put a small heart on it with a dimensional.  The square is one of the pennant word pieces cut into a square to make a present.  Then I cut off a row of the Calypso Coral that the small hearts were punched out of and put it behind the present.  I think this is really stinkin' cute!


My Paper Pumpkin is a great crafting opportunity delivered to your door during the third week of the month that includes all you need to complete the project (except scissors and occasionally adhesive).  It works great for those wanting to be creative but that do not want to invest in a full craft room or those that enjoy crafting and like to have a set project to complete when you need it.  If you do the project exactly as instructed, it will take you 30 minutes.  If you want to get a little more creative by combining it with your other supplies, it will take longer.  Each kit includes the photopolymer stamps (clear), ink, project pieces, and instructions.  Past kits include 8 cards, a farmable project with 12 tags, a 12 page mini book, etc.  The stamps in these kits are exclusive to subscribers and not available for general purchase.

A few great updates to this program that I’d like to share.

1 – Prepaid Subscriptions:  Now you can purchase pre-paid subscriptions for My Paper Pumpkin to use yourself or give as gifts.  These subscriptions COUNT TOWARDS HOSTESS BENEFITS which means you can collect them at your parties or pay up your subscription to get those benefits for your own kits!  The codes are below which include pre-paid shipping or you can click this link: http://www.stampinup.com/ECWeb/ItemList.aspx?categoryID=1444&&dbwsdemoid=80380.
  • 12-Month Prepaid Paper Pumpkin Subscription  - 137861 - Price: $215.40  - Save $2 per month
  • 6-Month Prepaid Paper Pumpkin Subscription  137860 - Price: $113.70 – Save $1 per month
  • 3-Month Prepaid Paper Pumpkin Subscription  137859 - Price: $59.85
  • 1-Month Prepaid Paper Pumpkin Subscription  137858 - Price: $19.95

2 – Changes to Starter Kit: Starting May 11th, if you sign up for Paper Pumpkin, you will not get the starter kit but the kit for that month like everyone else. You will receive a clear block in that package that is thinner than our current blocks and that works perfectly for the photopolymer stamps.  So if you sign up between May 11th and June 10th, you will receive June’s kit!

3 - Another great change is that SU has updated the design of the instructions included with each kit with a photograph showing each step and more. This will make completing the projects simple and fun for everyone.

Let me know today if you are interested in trying out My Paper Pumpkin to see if it’s right for you or having a My Paper Pumpkin party where everyone gets a kit of their own and we all get together to assemble them with the subscriptions counting towards the hostess’s party total!  Or just sign up here!

Have a craftastic day,
Stacy

Friday, May 2, 2014

Project Life - Catch the Moment

There are a lot of hard things about having a newborn and a preschooler and everyday is truly an adventure!  I find the hardest is making sure neither feels left out even if that leaves me as mommy crankypants sometimes!  Yesterday while working on laundry, I had to get the camera and take some photos of Michael (just turned 2 months) as he was trying to play with Pluto, my oldest daughter's pillow.  Once Callie came in and saw what was happening, she wanted to play and be in the photos too.  The result: very little laundry and a whole lot of laughs.

I thought these photos would work great for my first Project Life layout, which I just started selling and is available for purchase now on my online store.  Project Life is designed for those that want to scrapbook but don't have a lot of time to do it. Sound like you?  It certainly sounds like me these days.  There are five sets of cards and accessories in the new catalog but the one that is available now is called EVERYDAY ADVENTURE (get my earlier comments now?)  :)

 
Supplies:
Memento Black Ink pad, Project Life Journaling Pen, Variety Pack 12 x 12 Project Life Photo Pocket Pages, Project Life Day to Day Stamp Set, Everyday Adventure Project Life Card Collection, Everyday Adventure Project Life Accessory Pack, Adhesive
 
Couple of items to note:
  • I used the Project Life Journaling Pens to write in the year as it's not an option in the Project Life Day to Day stamp set.  I also doodled around the white area of one of the journaling cards with it.
  • The accessories that come in the Accessory Packs are fun to play with and would probably be great for cards and mini books too!  In this case,  I put an embellishment cluster on all three cards using supplies from that pack.   The middle features the washi tape that comes with this set - it looks to be Bermuda Bay. 
  • For the top journaling card, I did an embellishment cluster and then also added a 3 x 4 journaling card to the 4 x 6 card so that it had a little bit more going on.  I couldn't find another photo to use or I would have put that there instead. But I thought this was another good way to use the cards together.
Have a craftastic day,
Stacy

Thursday, May 1, 2014

Sneak Peek - In Colors 2014

There are many perks to being a demonstrator and one of them is the ability to attend exclusive events.  On Monday, mom and I attended the Catalog Premiere at Edwards.  We were gifted the Work of Art stamp set along with our new catalog.  They were short on sets so mom received a pack of In Color cardstock and a DSP pack, after already getting prize patrol for three of the new In Color ink pads (Blackberry Bliss, Hello Honey, and Lost Lagoon).  Being generous, she gave it all to ME in exchange for a promise to make her some samples.

Callie and I crafted together today and I finished my color comparisons for those three new colors.  I used a stamp-a-majig to keep them aligned, a great tool to use with the Work of Art stamp set featured in these cards!

 
Blackberry Bliss Sample
Cardstock and Ink: Blackberry Bliss
Chevrons (top to bottom): Wisteria Wonder, Elegant Eggplant, Rich Razzleberry, Blackberry Bliss

 
Hello Honey Sample
Cardstock and Ink: Hello Honey
Chevrons (top to bottom): So Saffron, Daffodil Delight, Crushed Curry, Hello Honey
 
 
Lost Lagoon Sample
Cardstock and Ink: Lost Lagoon
Chevrons (top to bottom): Pool Party, Bermuda Bay, Island Indigo, Lost Lagoon


I completed my pre-order and will have the other two In Colors (Mossy Meadow and Tangelo Twist) on Monday so I will post the other two samples then!

Check back tomorrow to see the Project Life spread featuring our new products that was done today when my kids needed attention during laundry time!

Have a craftastic day,
Stacy

Friday, April 25, 2014

Convention 2014 - Display Stamper Entry

Last month was my 10 year anniversary with Stampin' Up!  It's hard to believe it's been that long until I turn around in my craft cave and see the AMAZING amount of supplies I've bought from myself through the years.  :)

This year I will be forgoing Convention.  With Michael being only a few months old when it happens, my heart is needed elsewhere.  As much as I'd like to walk the line to celebrate, I will raise my glass and toast my tenure from the nursery!  However, I appreciate that I am able to submit my ideas for contention for a display stamper spot.  It's a way to potentially participate in the event I love without being there in person!

Finding which scrapbook page and 3D items I wanted to include was a challenge.  I went for my favorite two 3Ds that I've done in the last year.  As a card maker, it was a little easier to pick out those three to show an array of styles.  I'm not including supply lists but if you see something you need that for, please leave me a comment and I'll let you know!

Scrapbook Page

This page uses the Retro line of products and shows three different ways to use the woodcut items - stamped with ink, covered with papers, and covered with washi tape.  I was also able to show the use of the photopolymer stamps and our great pocket cards.  These pictures of my oldest (3 1/2 yrs) and newest (1 month) melt my heart!  She doesn't like that he cries but she loves being in photos with her brother more than she hates the noise!


3D Projects

This canvas is my favorite and not just because of my love for the subjects in it.  I love our flower punches and bright colored Designer Paper. It hangs right next to my desk to remind me of what inspires me most.

 
The stationary set is my other favorite 3D.  I did this project with my hostesses as an appreciation event.  The whole box uses 1/2 a pack of the Naturals Composition Designer Series paper.  It makes up the box, post-it holder, love notes, address book, and 5 full cards.  It was a labor of love to design but was a fun way to offer SU to both my décor customers and my card makers.


Cards

This first card is my Mother's Day card and one I'm teaching in a few weeks.  I love that our punches make paper crafting super duper easy and this card really showcases that!  It also highlights some of our new In Colors and our great new Fringe scissors.


The second card uses a lot of the products from the Perfect Pennants set and more of our punches.  I like the look of a stamped off image so the stamps in Crumb Cake are done this way.  It was too laborious to line up the small scallop circles for my camp customers but I love the way it turned out.  The strip of hearts are up on dimensionals.


The third card is a hybrid project I did for my Paper Pumpkin customers.  They needed some ideas to do with the starter kit and with the Memo Medley kit from October 2013.  I like the roll of paper cut out on a card or used for journaling.  The twine in the button is also from that kit - just separated to be only 2 strands.  I really like this layout on the card and the versatility of the starter kit set.


I know there are a lot of great demonstrators out there.  I hope I can see (through pictures) my art with theirs.  Wish me luck!

Have a craftastic day,
Stacy

Saturday, March 29, 2014

February 2014 - My Paper Pumpkin

Today is gray and rainy here.  Everyone in my McFamily is trying to find a way to stay busy -  making breakfast and watching golf, watching movies, making bead necklaces, putting together baby equipment or reading.  Myself, I've been trying to scrapbook for about 4 hours and I've done one 8 x 8 Simple Stories page in Michael's 12 month book. 

Because my time is so not my own between Callie and Michael, I used the February My Paper Pumpkin kit to help me with the scrapbooking I can get done.  The kit came with 5 high quality kraft bags, ribbons and clothespins, baker's twine, letters & scallop die cuts, Pistachio Pudding Stampin' Spot, and 2 circular photopolymer stamps. 

I used one of the bags and hooked on the letters for "photo".  The bags assembled quickly and would be ideal for giving sets of cards to friends and families.  Personally, I'm using the bag I made for when I print out my photos for 2014 so I can write on them and then store them until I have another window to scrapbook.

Stampin' Up! is also allowing for current subscribers to purchase refills for past kits that they have received.  These bags are such great quality that I'm thinking of buying more to help with my holiday gifts!  Check out this link to see kits that are available for purchase!

Don't forget that you have two more days to enjoy Sale-A-Bration!

Have a craftastic day,
Stacy

Thursday, March 27, 2014

Kid Friendly Crafting - Egg Carton Flowers

As I search for today's kid friendly craft to take to our play date, I thought I would post the craft Callie and I completed last week.  The project was inspired by this post found on Pinterest.

Step 1: Cut out all the cups from the paper egg carton.  Cut the sides into fours or eights depending on the size of the carton.  Bend down the edges carefully so they don't tear off.


Step 2: Put cling wrap around the other half of the egg carton and add your paint to it.  I recommend the Crayola Washable paints just for clean up purposes but I'm OCD that way!  :)  The plastic wrap keeps the paint from being sucked into the other half of the egg carton.


Step 3: Give your child the paint brush and the paint and let them go to town.  We used this craft to show how colors mix together to create other colors.

 
Step 4: Create a circle ring using cardboard.  Mine is about 12" in diameter but you can use any size you'd like.  A 12" ring will require about 15 cups. Paint and set aside. 

 
Step 5: Once painted, let everything dry.  Punch two holes to the top of the ring and thread a ribbon through it for hanging.  Use a hot glue gun to attach the individual flowers to the ring.

Step 6: Put Elmer's glue into the individual cups and pour in glitter, beads, buttons, or anything else shiny that the child enjoys! 


Callie is 3 1/2 years old and we came back to this project several times during the day.  She didn't have the attention span to do it all in one sitting.  But she has shown it off to everyone that has come to visit so she's very proud of it no matter how long it took!

Have a craftastic day,
Stacy

Wednesday, March 26, 2014

March 2014 My Paper Pumpkin Samples

A month ago, I brought a beautiful little boy into the world.  Between him and my very active pre-schooler that isn't in pre-school, my crafting times have been few and far between.  During this month, I have truly been able to embrace the My Paper Pumpkin product line that Stampin' Up! sells.  It has allowed me to get creative juices flowing while only having to break out a box and my scissors and adhesive.  It doesn't get easier than that.  If I want to follow instructions, I can.  If I want to get daring and do something different, I can do that too.  But all of that crafting energy is funneled into 30 minutes and leaves me with something to show for it and give away to someone else that might be having a hard time or a birthday or have something great happening in their lives too!

Whew, that was a long sentence!

I have two nieces getting ready to graduate from college and high school.  I cannot believe that as I look into the eyes of my own child born 1 month ago yesterday.  I am old.  But that isn't the point of the post - the point is that I will need to have some Congrats cards ready to put with their gifts since these are a few of life's milestones that cannot be ignored!

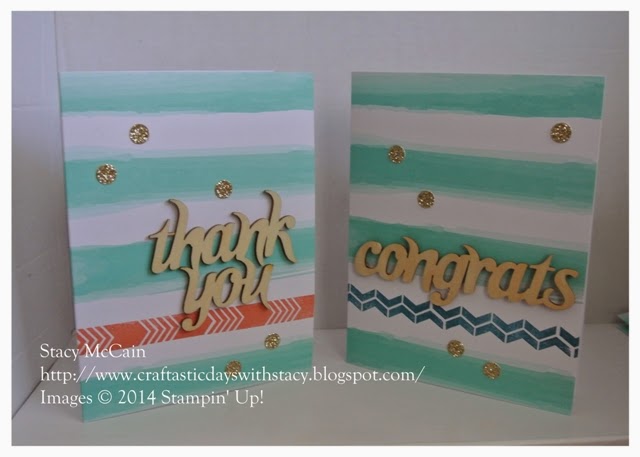
Thanks to My Paper Pumpkin, I have both of these events covered.  I also have several thank you cards ready for those that are helping with the baby or bringing out items to help my family.

This month's kit had supplies for EIGHT cards, two photopolymer stamps, two Stampin' Spots in Island Indigo and Calypso Coral, 8 gold inserts and envelopes, and embellishments.  That's quite the load!

The first cards I made were just like the samples in the instructions but I flipped the ink colors from what is on the instructions.


On this card I attempted to stamp the word cut element but I was crooked.  Yes, even with completely clear photopolymer stamps, I can be off-center.  Anyhow, I then dragged the word through the ink and attached it to the card.  The words are mounted on a piece of the gold insert that was cut down to 3 x 4.  I also stamped on the back of the insert and cut out an Indigo arrow to put on the bottom of the card.

The final card I finished was done with the Calypso Coral ink but is like the sample above, using the insert scraps and inking the wood element.


I hope you enjoyed these samples.  If you haven't yet joined My Paper Pumpkin, you can do so by March 31st and get a free set of 2012-2014 In Color markers with your Starter kit.  Check out https://mypaperpumpkin.com/en/?demoid=80380 for more information on this awesome promotion and product line.

Have a craftastic day,
Stacy