Tuesday, September 30, 2014

A Week of Boo-tiful Bags - Goodie Bags

Paper Pumpkin kits are mailed to your door and provide all the supplies you need to complete adorable projects (excluding scissors and adhesive).  You get a photopolymer stamp set, a Stampin' Spot of ink, instructions, and all the supplies needed to make either cards or 3D objects depending on the month.  The cost is $19.95 per month and you need to sign up by the 10th of the month to receive that month's kit around the 18th.  Kits are designed to take 30 minutes if you follow the instructions in the kit which is great for busy moms and new crafters.  Those with more experience can combine kits with other craft supplies and take a little more time to literally think "outside the box."  Have more questions - contact me today!

Today's project is what is included in the kit instructions.  These bags are adorable and are something that your kids could help you make or you could make and fill with kid treats like candy or adult treats like... Boo..ze... for a hostess gift for a Halloween party.


The kit includes six of these burlap bags, tags, colored clothespins, sequin trim, and all the embellishments and stamps needed to make the tags! If you want to make more than six of them, you can buy a refill kit or two as a subscriber for $7.95!  Click here to purchase: http://www.stampinup.com/ECWeb/ProductDetails.aspx?productID=136920&dwbs=80380


YOU CAN DO THIS TOO!

To sign up for Paper Pumpkin, visit https://mypaperpumpkin.com/en/?demoid=80380.

Perks for signing up under me:
  1. I have committed to having additional samples created using the kit by the first week of the month.  That way those that are cardmakers have options just like those that scrapbook or like decor.
  2. I will post frequent updates to the Pinterest board I have dedicated to Paper Pumpkin projects - again providing you inspiration to use with your kit if you need something different from the instructions included!
  3. I will host a Paper Pumpkin party that is free for the recipients of Paper Pumpkin with me.  Those crafting friends can come for free and enjoy good company and a pumpkin snack while putting together your kits.  These events will usually be the first Wednesday of the month!  There will also be a door prize given each month to the attendees and if you want to make any of the samples I show using the kit (that doesn't require hardware like frames), I will provide that for attendees as well.

New weekly deals have been posted - click the image below to see them in more detail!

http://www.stampinup.com/ECWeb/ItemList.aspx?categoryid=1634&dwbs=80380

Have a craftastic day,
Stacy

Monday, September 29, 2014

A Week of Boo-tiful Bags - FMS155 Card

Welcome back!  This week I'll be featuring five projects made using components from our September Paper Pumpkin kit - Boo-tiful Bags.  I think that burlap is such a fun product to work with and not many holidays bring out the creativity like Halloween does.  While the set lends itself to spooky, I've created a few projects that scream fall instead of just screaming!

Paper Pumpkin kits are mailed to your door and provide all the supplies you need to complete adorable projects (excluding scissors and adhesive).  You get a photopolymer stamp set, a Stampin' Spot of ink, instructions, and all the supplies needed to make either cards or 3D objects depending on the month.  The cost is $19.95 per month and you need to sign up by the 10th of the month to receive that month's kit around the 18th.  Kits are designed to take 30 minutes if you follow the instructions in the kit which is great for busy moms and new crafters.  Those with more experience can combine kits with other craft supplies and take a little more time to literally think "outside the box."  Have more questions - contact me today!

We'll start today with the card I made.  I've been lurking on Freshly Made Sketches for a long time but just recently started posting projects using their layouts.  It saves me a lot of my time to leverage their designs and leaves me more time to play (assuming the kids let me in the craft cave for that long!)  This week's sketch would work great for Christmas cards but also worked nice with the tags in the Paper Pumpkin kit. 

http://freshlymadesketches.blogspot.com/2014/09/freshly-made-sketches-155-sketch-by.html
For my card, I flipped the tag to it's side and added a little gorgeous splatter (seemed appropriate for the holiday).  I used my lovely fringe scissors to create a fringe and leveraged the 2014-2016 In Color Paper Stack since this kit came with Tangelo Twist as the ink spot!
 

Supplies:
  • Paper Pumpkin kit - two tags, Happy Halloween stamp, Tangelo Twist Ink Spot, Dimensionals, and crow sticker
  • Other: 2014-2016 In Color Paper Stack, Basic Black and Very Vanilla cardstock, Fringe Scissors, and adhesive

YOU CAN DO THIS TOO!

To sign up for Paper Pumpkin, visit https://mypaperpumpkin.com/en/?demoid=80380.
 
Perks for signing up under me:
  1. I have committed to having additional samples created using the kit by the first week of the month.  That way those that are cardmakers have options just like those that scrapbook or like decor.
  2. I will post frequent updates to the Pinterest board I have dedicated to Paper Pumpkin projects - again providing you inspiration to use with your kit if you need something different from the instructions included!
  3. I will host a Paper Pumpkin party that is free for the recipients of Paper Pumpkin with me.  Those crafting friends can come for free and enjoy good company and a pumpkin snack while putting together your kits.  These events will usually be the first Wednesday of the month!  There will also be a door prize given each month to the attendees and if you want to make any of the samples I show using the kit (that doesn't require hardware like frames), I will provide that for attendees as well.
Have a craftastic day,
Stacy

Friday, September 26, 2014

A Week of Making Spirits Bright - Gift Tags

To finish out the week of samples for Making Spirits Bright, I'm diving into a future camp project that my mom (Cris McCarthy) made for her next stamp camp.  These tags were something I wanted to make with the Give Thanks image for the Thanksgiving holiday but I'm short on time and she's already done the work, so......

The main portions of the tags are from the Banner BigZ Sizzix die which is on sale until Monday, September 29th.  Just score at 1 3/4 and punch a hole using the 1 3/8 circle punch.  The stamped image is on Whisper White and punched out using the 2 1/2 Circle punch.  The candy cane is colored with a Real Red marker and the holly with Pear Pizzazz.  Finally, the little brads in the center of the holly are colored using the lightest Cherry Cobbler Blendability marker.


Supplies:
  • Cardstock: Real Red, Whisper White
  • Ink: Basic Gray
  • Stamp Set: Making Spirits Bright
  • Accessories: Big Shot & Cutting Mats, Party Pennants Bigz Die, Basic Pearls, Cherry Cobbler Blendabilities, Real Red & Pear Pizzazz Markers, 2 1/2 Circle Punch, 1 3/4 Circle Punch, Bone Folder, and Adhesive

Wouldn't these be great for the holidays using ANY image from the Making Spirits Bright set?  I hope you enjoyed my samples this week.  Tune in next week for five great samples made from our September Paper Pumpkin kit - Boo-tiful Bags!

Have a craftastic day,
Stacy

Thursday, September 25, 2014

A Week of Making Spirits Bright - Loving You

My husband plays in a band and he's doing his last gig of 2014 this week.  Yesterday my son got his six month shots and I sent my daughter to school hoping she wouldn't come into contact with anyone with a stomach bug since I don't really want to have that in my house right now with all the things we have going on.  As I reflected on how my heart was full of love for these three people, I thought it would be nice to create a heart card for my husband for when he gets home tomorrow.

The Love You is for my son.
The hearts are for my daughter (who helped me punch them and fills mine up).
The cocktail is for my husband who makes the best martini in the whole world.  He gets the love and hearts too.....

At a workshop this week I was asked about the Lullaby paper so it reminded me to pull it out and use it.  I punched the hearts using the Itty Bitty Accents Punch Pack and layered several with dimensionals.  The ones that I kept flat on the card were blinged up with a little rhinestone action.


Supplies:
  • Cardstock/DSP: Lullaby DSP, Crisp Cantaloupe cardstock, Whisper White cardstock
  • Ink: Soft Suede
  • Markers: Hello Honey & Crisp Cantaloupe
  • Stamp Set: Making Spirits Bright
  • Accessories: Itty Bitty Accents Punch Pack, Basic Rhinestones, Dimensionals, Glue Dots, and Adhesive

Have a craftastic day,
Stacy

Wednesday, September 24, 2014

A Week of Making Spirits Bright - Birthday

Today I bring you another sample using Making Spirits Bright.  I've been in a purple and gold mood lately as it's my alma mater colors and we have been spending a lot of time in these colors cheering on our new football team!  Go Yotes!

This card reminds me of my college days.  I really like that this image comes with a "Let's get toasty" saying and it would look great on the front of the card.  However, I know that's not for everyone, so I stuck with the Happy Birthday on the banner instead.  Though this will likely go to a fellow alum for her birthday.....


I wanted to include a little pop of color on the candle so I chose another new In Color, Hello Honey.  I used the hexagon punch to do the banner for the saying and popped on dimensionals.  Then I chose the banner punch to do the small stripe under it.  A few rhinestones for prettiness and I've got another camp card and a future layout with another set.

Supplies:
  • Cardstock/DSP: Color Me Autumn DSP, Moonlight Designer Series Paper Stack, Blackberry Bliss cardstock, Whisper White cardstock
  • Ink: Blackberry Bliss
  • Stamp Set: Making Spirits Bright
  • Accessories: Big Shot and Cutting Mats, Banner Punch, Hexagon Punch, Basic Rhinestones, Hello Honey & Blackberry Bliss Markers, Dimensionals, and Adhesive

If you aren't a fan of this set, even after these great samples, just substitute in the Sketched Birthday set and you can do the same exact cards using a marker for the saying.

Have a craftastic day,
Stacy

Tuesday, September 23, 2014

A Week of Making Spirits Bright - Halloween

While intending to work on my Christmas cards, I realized I have two Halloween camps coming up with nothing prepped.  Now our awesome Paper Pumpkin kit is Halloween themed and I'm posting those projects next week.  But I really needed to use the other Halloween products that I bought before realizing that kit would work for everything!

Next Thursday is my Halloween wreath class and it's also World Cardmaking "Week" from Stampin' Up!  So we have to make a card, right?

I couldn't find a layout so again I went to my sketch folder that I haven't been tapping and realized that there would be a new Mojo Monday sketch that might inspire me. 

http://www.mojomonday.blogspot.com/2014/09/mojo-monday-364.html
 

I really like the "Bring on the Boos" as it makes me think of my daughter and how she puts a sheet over her head and runs up and screams "Boo" like the least scary ghost ever. It also reminds me of all those Halloween parties with friends from college.  No need to tell more stories than that since those that were there know exactly what I mean!   Since this card is for my fun-loving wine drinking crafters, I thought this was a great card for them to make after they work on their wreaths.


Supplies:
  • Cardstock/DSP: Motlley Monsters DSP, Tangerine Tango, Whisper White, Basic Black, Sahara Sand
  • Ink: Tuxedo Black Memento Pad
  • Stamp Set: Making Spirits Bright
  • Accessories: White Stampin' Chalk Marker, Hexagon Punch, White & Tangerine Tango Two Tone Trim, Brights Candy Dots, Dimensionals, Scissors, and Adhesive
Couple of things on this card:
  • The white and tangerine tango trim is easy to separate.  If you do, you can tie it and have it flat on a card so it's easier to mail.  Plus it looks cool.
  • Don't forget that you can use the hexagon punch to make those banner ends.
  • Chalk markers work for more than just black cardstock.  If you want a solid white accent, you can't beat this tool.  And it's only $3.50.
 

New weekly deals have been posted and there are some great ones this week.  Click here to review them in detail and order. 
http://www.stampinup.com/ECWeb/ItemList.aspx?categoryid=1634&dwbs=80380
 
 
You can also purchase refills for the newest Paper Pumpkin kit.


Have a craftastic day,
Stacy

Monday, September 22, 2014

A Week of Making Spirits Bright - Christmas

This week's projects will all focus on Making Spirits Bright.  This is a great set, no matter how you like to celebrate! 

http://www.stampinup.com/ECWeb/ProductDetails.aspx?productID=135089&dwbs=80380

I have been saying for years that I want to do some of these great sketch challenges that are out there.  When working on my Christmas camp ideas, I found myself really struggling on putting things together.  Could it be the kidlet homework or my cold or my son's teething that were distracting me?  Likely but that doesn't stop me from needing some mojo and quick for these classes!

Enter Freshly Made Sketches.  I always browse this site but have yet to take on a challenge.  Now I have to wonder why since I saw this sketch and 10 minutes later had this fun and replicable card!

http://freshlymadesketches.blogspot.com/2014/09/freshly-made-sketches-154-sketch-by.html

Since I'm thinking Christmas while wearing a tank top (90 degrees in September... really???), I started by cutting the strips of DSP and using that to define my color pallet for the card.  Have you seen this Under the Tree paper?  More importantly, have you touched it??  It's heavy weight and beautiful!  It's perfect for boxes too but you'll see those later...

Next up, the focal image.  I didn't like white cardstock on the card because it was too stark but how great to use our chalk marker to make it pop.  A little coloring with my markers, who have been neglected since my Blendabilities Markers arrived, and a bow just to make my camp customers sigh...

Supplies:
  • Cardstock/DSP: Under the Tree Specialty Designer Paper, Cherry Cobbler & Crumb Cake cardstock
  • Ink: Crumb Cake, Memento Tuxedo Black ink
  • Stamp Set: Making Spirits Bright
  • Accessories: Chalk Marker, Twine, Cherry Cobbler Marker, Garden Green Marker, Crumb Cake Marker, Dauber, Scissors, Dimensionals, and Adhesive
You can find these supplies and more at my Online Store.

Come back tomorrow for another idea using this set.  If you want to make this card, my Christmas camp is on November 15th or I can come to your house for a holiday workshop.  Leave me a comment if you are interested!

Have a craftastic day,
Stacy


Wednesday, September 17, 2014

New Weekly Specials & September Paper Pumpkin

While there have been some delays in getting the Paper Pumpkin kits out to all customers that ordered them, the offering looks like it's worth the wait.  Below is a sneak peek of what's in the kit if you are interested.  Those that signed up using the Half Off special got this great kit for only $10!  But you can see that it's worth the $20 the rest of us paid for it.  And when you are a member, you can also order refills so you can make more of these bad boys too!


You can sign up for Paper Pumpkin here: https://mypaperpumpkin.com/en/?demoid=80380

Also, the new weekly specials have been posted and there are some great ones!


http://www.stampinup.com/ECWeb/ItemList.aspx?categoryid=1634
 
 
Have a craftastic day,
Stacy

Friday, September 12, 2014

New Photopolymer Stamps - You're Wonderful

There are so many wonderful things in life and with this new stamp set, Stampin' Up! makes it easier for you to tell the wonderful PEOPLE in your life what you think of them.


The Web site also includes some great samples using this set and I'm sure that Pinterest will be overwhelmed by cute ideas once all us demonstrators get this set in their collection!  Here are a few that Stampin' Up! concept artists came up with - cute, eh?


You can buy this stamp set today - just click here!

Have a craftastic day,
Stacy

Friday, September 5, 2014

A Week of Seriously Amazing - Envelope Mini Book

This week's projects feature the Seriously Amazing Paper Pumpkin kit from August 2014.


Paper Pumpkin kits are mailed to your door and provide all the supplies you need to complete adorable projects (excluding scissors and adhesive).  You get a photopolymer stamp set, a Stampin' Spot of ink, instructions, and all the supplies needed to make either cards or 3D objects depending on the month.  The cost is $19.95 per month and you need to sign up by the 10th of the month to receive that month's kit around the 18th.  Have more questions - contact me today!

Now onto the projects!

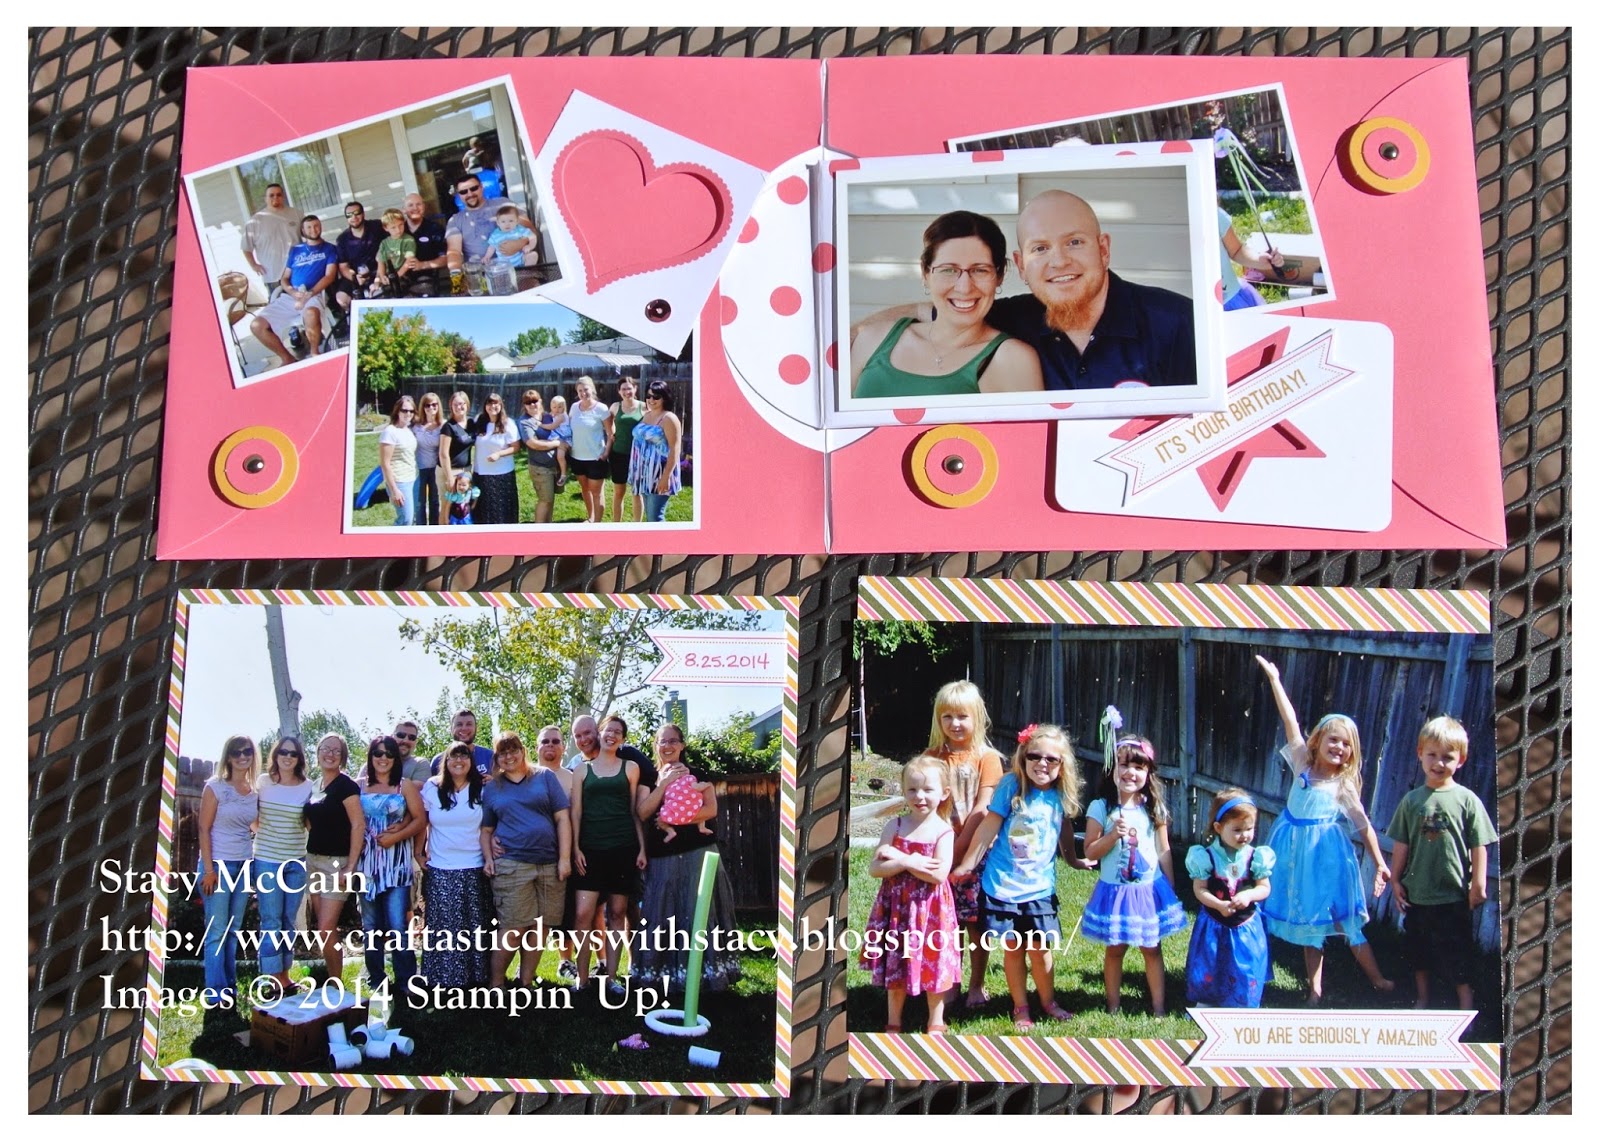
I love mini books and because I've been crammed for time, even with Callie starting preschool, I needed something to quickly scrapbook her 4th birthday party.  Enter Paper Pumpkin again to the rescue.

 
The book is made by inserting the flaps of the two large pink envelopes without adhesive into each other.  I decorated the front with a die cut and created a banner with another scrap I had from cutting one of the cards up.  Add a banner end and use masking to just stamp "Best Friend Ever" from the photopolymer set.

 
I cut down one of the heart stencils to layer on the inside with a few wallet photos of our friend family.  I also layered the small and large circles together and added them to the layout to fill in some of the space.

 
I cut one of the cards apart and used it for mounting two large group photos of my bestest friends on one and Callie's bestest friends on the other.  The little banners provide a great journaling opportunity whether left straight and stamped or folded over.  I used the Strawberry Slush marker to do my journaling on the back of the inserts with the names and some memories from her party. 
 
 
One other little detail - I added one of the small envelopes to the center flap.  I used the adhesive already included on the envelope to attach it so it will flip as the book is opened.  I put a photo on one side of it and then created an insert using Hello Honey cardstock (the scrap from the other projects I've done this week) and created a tab to pull the photo out.

Fun, huh?
YOU CAN DO THIS TOO!
You can still sign up for 2 months at 50% off until September 10th- that's just over $10 with tax for a lot of creativity delivered right to your door!  To sign up for Paper Pumpkin, visit https://mypaperpumpkin.com/en/?demoid=80380 and enter promo code HALFOFF2!
Perks for signing up under me:
  1. I have committed to having additional samples created using the kit by the first of the month.  That way those that are cardmakers have options just like those that scrapbook or like decor.
  2. I will post frequent updates to the Pinterest board I have dedicated to Paper Pumpkin projects - again providing you inspiration to use with your kit if you need something different from the instructions included!
  3. I will host a Paper Pumpkin party that is free for the recipients of Paper Pumpkin with me.  Those crafting friends can come for free and enjoy good company and a pumpkin snack while putting together your kits.  These events will usually be the first Wednesday of the month!  There will also be a door prize given each month to the attendees and if you want to make any of the samples I show using the kit (that doesn't require hardware like frames), I will provide that for attendees as well.
Have a craftastic day,
Stacy

Thursday, September 4, 2014

A Week of Seriously Amazing - Project Life

This week's projects feature the Seriously Amazing Paper Pumpkin kit from August 2014.


Paper Pumpkin kits are mailed to your door and provide all the supplies you need to complete adorable projects (excluding scissors and adhesive).  You get a photopolymer stamp set, a Stampin' Spot of ink, instructions, and all the supplies needed to make either cards or 3D objects depending on the month.  The cost is $19.95 per month and you need to sign up by the 10th of the month to receive that month's kit around the 18th.  Have more questions - contact me today!
Now onto the projects!
I love Project Life - I just need to get over my fear of chronological scrapbooking to take full advantage of it.  My daughter's first day of preschool seemed like a great event to try it out with.  After all, she was cute and the things she said were things I wanted to remember.  The stamps from this kit and the embellishments were just what I wanted for my little star!


First I cut a piece of Hello Honey to use for the 4 x 6 piece at the top.  I layered the die cut word on it and then used a scrap from when I cut the card on the last project to add to the right side.  The saying is on dimensionals on the outside of the pocket page so that it's dimension wasn't lost on the inside. 

I also cut a 3 x 4 piece of Hello Honey to insert into the lower left pocket.  I cut the flap off the little envelope and attached it on top of the page using dimensionals.  A wallet photo fit perfectly on it and then I used one of the little cards for journaling and slipped it into the pocket.  There is also a photo on the back of it of her standing in front of her school.


For the photo piece, I cut my photo to 3 x 4.  I adhered the flap piece I cut onto the pocket page with adhesive and layered the tag with the date and title on it using dimensionals. 

LOVE IT!

YOU CAN DO THIS TOO!
You can still sign up for 2 months at 50% off until September 10th- that's just over $10 with tax for a lot of creativity delivered right to your door!  To sign up for Paper Pumpkin, visit https://mypaperpumpkin.com/en/?demoid=80380 and enter promo code HALFOFF2!
Perks for signing up under me:
  1. I have committed to having additional samples created using the kit by the first of the month.  That way those that are cardmakers have options just like those that scrapbook or like decor.
  2. I will post frequent updates to the Pinterest board I have dedicated to Paper Pumpkin projects - again providing you inspiration to use with your kit if you need something different from the instructions included!
  3. I will host a Paper Pumpkin party that is free for the recipients of Paper Pumpkin with me.  Those crafting friends can come for free and enjoy good company and a pumpkin snack while putting together your kits.  These events will usually be the first Wednesday of the month!  There will also be a door prize given each month to the attendees and if you want to make any of the samples I show using the kit (that doesn't require hardware like frames or pocket pages), I will provide that for attendees as well.
Have a craftastic day,
Stacy

Wednesday, September 3, 2014

A Week of Seriously Amazing - Decorated Envelopes

This week's projects feature the Seriously Amazing Paper Pumpkin kit from August 2014.

 
Paper Pumpkin kits are mailed to your door and provide all the supplies you need to complete adorable projects (excluding scissors and adhesive).  You get a photopolymer stamp set, a Stampin' Spot of ink, instructions, and all the supplies needed to make either cards or 3D objects depending on the month.  The cost is $19.95 per month and you need to sign up by the 10th of the month to receive that month's kit around the 18th.  Have more questions - contact me today!

Now onto the projects!

I have a few customers that ALWAYS like to stamp their envelopes.  I tend to forget this part, just as I tend to not stamp anything but a sentiment on the inside of my cards.  In this case, I was inspired by a wedding invitation we received.  The bride and groom are asking that no one bring gifts but they will have a money tree available.  I started thinking - if you wanted to give them something but also wanted to include a word or two of encouragement with this new journey, how would you do that on a money tree?  Then it hit me that I could decorate an envelope, put a letter inside and our money.


I cut the card in half and used it for the background on the envelope.  The sentiment is raised with dimensionals with the twine tied in a bow.  I'm a clustered embellishment fan so I put the rhinestones in the opposite corner as the bow.

YOU CAN DO THIS TOO!

You can still sign up for 2 months at 50% off until September 10th- that's just over $10 with tax for a lot of creativity delivered right to your door!  To sign up for Paper Pumpkin, visit https://mypaperpumpkin.com/en/?demoid=80380 and enter promo code HALFOFF2!
Perks for signing up under me:
  1. I have committed to having additional samples created using the kit by the first of the month.  That way those that are cardmakers have options just like those that scrapbook or like decor.
  2. I will post frequent updates to the Pinterest board I have dedicated to Paper Pumpkin projects - again providing you inspiration to use with your kit if you need something different from the instructions included!
  3. I will host a Paper Pumpkin party that is free for the recipients of Paper Pumpkin with me.  Those crafting friends can come for free and enjoy good company and a pumpkin snack while putting together your kits.  These events will usually be the first Wednesday of the month!  There will also be a door prize given each month to the attendees and if you want to make any of the samples I show using the kit (that doesn't require hardware like frames), I will provide that for attendees as well.
Have a craftastic day,
Stacy

Tuesday, September 2, 2014

A Week of Seriously Amazing - Full Cards

This week's projects feature the Seriously Amazing Paper Pumpkin kit from August 2014.


Paper Pumpkin kits are mailed to your door and provide all the supplies you need to complete adorable projects (excluding scissors and adhesive).  You get a photopolymer stamp set, a Stampin' Spot of ink, instructions, and all the supplies needed to make either cards or 3D objects depending on the month.  The cost is $19.95 per month and you need to sign up by the 10th of the month to receive that month's kit around the 18th.  Have more questions - contact me today!

Now onto the projects!


This project is from the instructions included in the kit.  I took the dot stamp and stamped it three times before I reinked so that I could get those three monochromatic shades.  The kit includes glue dots that can be used for the really pretty Strawberry Slush rhinestones.


The next project came from me smudging the bottom of the die cut with my finger.  Guess it's hard to stamp with a 4 yr old on your lap trying to see!  I cut off the lower 1/2 inch and rounded the upper corners using our Project Life Corner Rounder.  I also cut a strip of Hello Honey cardstock to go under the sentiment.  I think I mentioned that I wasn't getting much sleep this week with my husband being gone and the stripes were starting to make me see double!  I think it makes the sentiment stand out very nicely.  I wrapped the twine around the card instead of the envelope and did a few rhinestones again on the words.


YOU CAN DO THIS TOO!

You can still sign up for 2 months at 50% off until September 10th- that's just over $10 with tax for a lot of creativity delivered right to your door!  To sign up for Paper Pumpkin, visit https://mypaperpumpkin.com/en/?demoid=80380 and enter promo code HALFOFF2!
Perks for signing up under me:
  1. I have committed to having additional samples created using the kit by the first of the month.  That way those that are cardmakers have options just like those that scrapbook or like decor.
  2. I will post frequent updates to the Pinterest board I have dedicated to Paper Pumpkin projects - again providing you inspiration to use with your kit if you need something different from the instructions included!
  3. I will host a Paper Pumpkin party that is free for the recipients of Paper Pumpkin with me.  Those crafting friends can come for free and enjoy good company and a pumpkin snack while putting together your kits.  These events will usually be the first Wednesday of the month!  There will also be a door prize given each month to the attendees and if you want to make any of the samples I show using the kit (that doesn't require hardware like frames), I will provide that for attendees as well.

Have a craftastic day,
Stacy

Monday, September 1, 2014

A Week of Seriously Amazing - Gift Cards

This week's projects feature the Seriously Amazing Paper Pumpkin kit from August 2014.


Paper Pumpkin kits are mailed to your door and provide all the supplies you need to complete adorable projects (excluding scissors and adhesive).  You get a photopolymer stamp set, a Stampin' Spot of ink, instructions, and all the supplies needed to make either cards or 3D objects depending on the month.  The cost is $19.95 per month and you need to sign up by the 10th of the month to receive that month's kit around the 18th.  Have more questions - contact me today!

Now onto the projects!
Baby Gift Card

 
This was created to hold a gift card for a shower I was invited to later this month.  I cut out the star from the stencil included in the kit and stamped it with the small dot from the stamp set.  I tied the twine around it and stamped the Seriously Awesome sentiment because I think MOTHERHOOD is the most amazing thing a woman can do in the world. 

Birthday Gift Card
 
 
This one is pretty close to the sample in the instructions, though I didn't realize that until later.  A few strategically placed rhinestones and a banner that is on dimensionals instead of the die cut make this a great little gift card for the next birthday that comes our way!
 
YOU CAN DO THIS TOO!

You can still sign up for 2 months at 50% off until September 10th- that's just over $10 with tax for a lot of creativity delivered right to your door!  To sign up for Paper Pumpkin, visit https://mypaperpumpkin.com/en/?demoid=80380 and enter promo code HALFOFF2!
Perks for signing up under me:
  1. I have committed to having additional samples created using the kit by the first of the month.  That way those that are cardmakers have options just like those that scrapbook or like decor.
  2. I will post frequent updates to the Pinterest board I have dedicated to Paper Pumpkin projects - again providing you inspiration to use with your kit if you need something different from the instructions included!
  3. I will host a Paper Pumpkin party that is free for the recipients of Paper Pumpkin with me.  Those crafting friends can come for free and enjoy good company and a pumpkin snack while putting together your kits.  These events will usually be the first Wednesday of the month!  There will also be a door prize given each month to the attendees and if you want to make any of the samples I show using the kit (that doesn't require hardware like frames), I will provide that for attendees as well.

Have a craftastic day,
Stacy