My Paper Pumpkin box was waiting for me, along with my holiday catalog pre-order, when I got home from vacation on Sunday. I was more excited to play with my little red box than I was to play with my holiday supplies and it turned out that I needed what was in there!
Our friend group took a few hits when we were on vacation and one grandfather and three grandmothers passed away in the span of that week While I never look forward to making or mailing a sympathy card, I knew that there was a simple and elegant sympathy stamp in our kit this month and that I could design something that I could use to send my condolences.
Today I will post the cards and tomorrow I'll post the boxes and a few tips for this kit! If you are local and a subscriber of mine for Paper Pumpkin, you should come to the open house on August 29th between 10-6pm to do this kit and any others you are behind on. I'll have out my punches and such to help you create while eating a pumpkin treat!
Card 1: I created a 8 1/2 x 5 1/2 card base out of Thick Whisper White. I stamped the tag and sponge the tag and attached it with adhesive. I used one of the flowers and curled the edges with a bone folder and layered with a dimensional.. Then I stamped the circle on a piece of black paper and punched out using the 1 3/8 punch. I sponged it and attached with a dimensional.
Card 2: For this one, I layered the Vanilla tag on the gold striped card. I stamped just the "love" from "with love" and stamped in the center. I stamped the flourish and then put a medium pearl in the center of each. Then I attached it to the card using adhesive.
Card 3: For this one, I layered the Vanilla tag on the card using dimensionals. Then I BENT the long flourish so that it would stamp in a curve (cool perk of using photopolymer stamps) and stamped it on the tag. It's layered with dimensionals after I sponged it. Then I took one of the spare tags (with the straight edges) and cut off a strip. I stamped With Love on it and inked it and then cut it into a rectangle. It's also sponged and layered with dimensionals. A great wedding card!
Card 4: I made two of these. The pink banner is layered on the card using adhesive. Then I stamped the saying on the tag and sponged it. It's layered on the card with dimensionals. Then I used the cardstock left over from the flower die cuts and punched two pink flowers using the Petite Petals Punch and the Itty Bitty Accents Punch Pack and curled them with the bone folder. They are layered with a glue dot and added to the card using the dimensionals. I also added a white accent to the center because I love them.
Card 5: I cut one of the bow cards in half and mounted it on a Very Vanilla love note. I then stamped the tag and layered it on the card using dimensionals. I punched out the 1 3/8 circle from the leftover pink paper in the kit and created another layered flower using Very Vanilla and pearls.
Card 6: This is another version of the sympathy card only done on a Whisper White love note. The flower has a pink small flower from the leftover pink paper and the white flower is actually punched out of the strip of bow paper that I had left over but turned over! Another white accents makes an appearance in the flower.
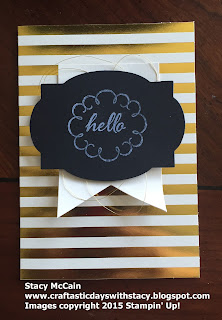
Card 7: This card has the vanilla tag curled with the bone folder and mounted to the card using adhesive. Then the is a flourish of gold metallic thread behind the sentiment and the tag is lifted using dimensionals.
I hope you enjoyed these samples - leave me a comment on which one is your favorite! For ideas on how to stamp different sayings on the tags using this stamp set, please watch the YouTube video posted by Stampin' Up!: https://www.youtube.com/watch?v=FQCr0Aqinfk
Check out this week's great deals via my online store and use V3JMFJWP upon checkout!
That gold satin ribbon would be wonderful on your holiday cards!
Have a craftastic day,
Stacy


No comments:
Post a Comment
Note: Only a member of this blog may post a comment.