Kits are designed to be completed in 30 minutes or so, most of the time. They come with instructions, project/card supplies, ink, and photopolymer stamps. Lately they have also included adhesive! These products will be on trend and the kits will be either cards or 3D. Part of your pumpkin adventure is that you don't know what you will get until it shows up at your door! And, if you get a kit that isn't up your alley, put it together and give it as a gift to someone for the holidays or birthdays or just because! That cost is $19.95 per month plus tax and is charged on the 11th of the month. But not today....
FIVE DOLLARS? And you get a stamp set, supplies for 4 bags and 6 cards, plus an ink spot and it's mailed to you. Click below to take advantage of this by 6:50pm MST on Saturday, May 9th.
Sign up here: https://mypaperpumpkin.com/en/?demoid=80380For a full video of the March kit, Sew You, check out this YouTube video.
Now onto the projects! When I saw the March kit, I thought of the thank you notes I needed to make for my son's birthday and thought it was perfect since I needed 7 of them and the kit came with 9! The cards were a standard mailing size and flat so no extra postage needed! After sewing 7 cards straight, I realized my hands are out of practice and I needed to come up with something else to show my customers, especially those with arthritis that may prevent them from doing that sewing. The look of the project from the kit was ADORABLE but it was also way more than the typical 30 minutes the kits used to take.
Here was the standard project and a different card layout using the same supplies.
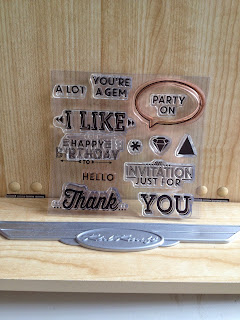
The kit wasn't just for thank you cards though. The stamp set came with a TON of images to help with any occasion. As a tip, don't forget to clean your stamps after you use them and put them away. I left my ink on these on my craft desk and some of them are going to stay that pretty brown forever now...
Now, I've posted a lot of really cute samples with this kit in Pinterest. But I am just SOOO proud of this project and proud of myself for getting some photos of my son up on the wall to go with all those pictures of his sister. We don't want him thinking I play favorites but his sister has a LOT of wall space real estate in this house!
So this project takes the following supplies: 4 envelopes, 2 polka dot cards, 1 striped card. I used fast fuse to hold mine together since it would be hanging. Current subscribers can buy refill kits which is what I used to create my mini envelope décor item!
To do the base, adhere the flaps of each envelope to the one on top of it. For the top envelope, pierce two holes using the needle and thread through a piece of the string. Then tie the ends in knots and fold the top flap of the envelope down about 1/2" to cover the string ends.
To finish the base of this project, just cut the polka dot cards in half and put into the envelopes. You can put photos on the front and then journal on the back. These photos are wallet sized. They slide in and out easily because there isn't much dimension added with the photos.
For the top envelope, I stamped the word bubble on the striped paper and cut it out so that the triangle at the bottom was removed. I inked the edges with the ink spot and did the same to the Hello piece after I stamped it. It's up on dimensionals and the cute epoxy star is included in the kit.
For this flap, I did the word bubble the same way but left it so it worked for a "caption". I inked the "Happy" from the happy birthday stamp on a scrap and cut out. It's up on dimensionals as well.
For the bottom two flaps, I cut one of the striped cards in half. For the top envelope, I attached the card to the envelope so the photo with journaling goes on the inside. The YOU on the die cut is done with a black marker for those that don't want to do the sewing. I loved the look and the heart epoxy sticker is also in the kit.
The last envelope is the 2nd half of the striped card folded accordion style. Inside are more photos from our photo shoot. I inked up just "You're A" from the stamp and cut them out. The gem epoxy sticker is also in the kit. Since I wanted to use the string somewhere, I used it to tie the booklet shut.
I know that I'm biased. My son is the cutest boy I've ever seen and these photos enhance that (in my motherly opinion). But to have a project that came to the door and worked for his 1 year photos and his 1 year thank you notes was ideal. If you are local and love these photos as much as I do, you can set up a sitting with Heidi Hagman too (www.heidihagmanphotography.com).
I hope you sign up to join me with Paper Pumpkin. You can see more information about the program here: http://craftasticdayswithstacy.blogspot.com/2013/07/join-my-paper-princesses-club.html
Have a craftastic day,
Stacy


No comments:
Post a Comment
Note: Only a member of this blog may post a comment.