Filling the Divided Protectors
You can always cut down your photos so that they fit the various holes in the template. The templates have the following sizes of photos (H x W) and the quantity represents the pages being double-sided.- 2 x 2 - 80
- 4 x 4 - 16
- 4 x 6 - 4
- 4 x 2 - 4
- 6 x 4 - 4
- 2 x 4 - 4
- 3 x 4 - 4
- 4 x 3 - 16
Other ideas:
- You can fill the holes using photos, pocket cards, cardstock, Designer Series Paper (DSP), or elements created through My Digital Studio (MDS).
- You can mat your photos so that the colored paper on the back of the photos shows on the other side of the protector.
- You can use the embossing folders on cardstock to insert in the holes and then mat your smaller photo on them.
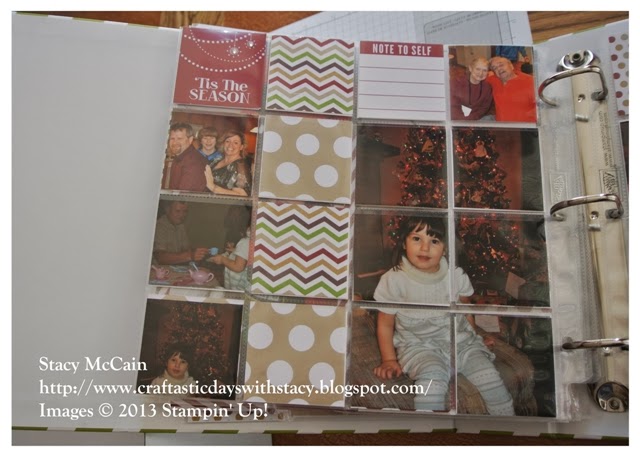
- You can cut a photo to 4 x 4 and then cut it to 4 photos at 2 x 2 and put that in your album or cut a 4 x 6 into 6 2 x 2 squares. I did this with the photo of Callie below. This idea was courtesy of Ronda Wade and provided during Creative Convention Online - Holiday Edition. When doing this, make sure you don't cut through the face to split it up and make it look like a Halloween photo instead of a holiday photo!
MDS Tips for resizing photos for divided protectors
You can create a template in MDS that allows you to zoom in on photos to make them the correct size for the divided protectors. Then you can print them out on 4 x 6 sheets on your own printer or at a kiosk somewhere.
Creating the Template:
- Open MDS
- Click Custom
- Set size parameters at the top as 4 inches (width) x 6 inches (height)
- Click Create Project
- Name - 2x2 template
- If you need to put the template in a specific folder, click Change Location, click on the folder, and click Select Folder. If it's already selected, skip this step.
- Click OK.
Adding Photo Boxes:
- Click Photos from the Design Center (on the right)
- Click Photo Box
- Right click on the photo box and select Edit Object
- Change the W to 2 and the H to 2
- Uncheck box by Keep Proportions
- Click the red x to close the box
- Click on the photo box and click Ctrl-C
- Click below it and click Ctrl-V
- Repeat so you have 3 boxes
- Hold down on your Ctrl key and left mouse click on all three photo boxes
- Right click on one box and click Select Align
- Select Left
- Right click and select Align again
- Select Space Evenly - Vertically
- While all three boxes are still selected, click Ctrl-C
- Click Ctrl-V - this creates a new aligned row of boxes
- Drag the boxes to the left
- Click Ctrl-S to Save your template
- Click File from the upper right and click Save As. Re-save as Christmas 2x2 - otherwise you will be saving into your template so you won't be able to use it on future divided protector projects.
Adding Photos to the template
- Right click on Page 1 at the bottom - Insert Duplicate Page
- Repeat for as many photos as you will need
- Under the Resource Palette on the left, click the camera icon and click Browse to find the folder with your photos.
- Once you find the folder, click Open
- Drag each photo over into your project on a photo box until the box turns blue
- Use the + magnifying glass button to zoom into your photo so you capture the part of the photo you want to include. Drag the box so that it hightlights the right part of your photo. Click OK.
- Repeat this process until all photos have been added.
- Click Ctrl-S
Printing the Photos
- Click Share from the Design Center on the right.
- Select Export Pages - JPG PNG PDF
- Click Change Location, Select the folder, & click OK
- Click Finish
- Click OK when prompted that the save is complete.
- When you go to print the photo, you will print it as a 4x6. Then you can cut out the 2x2 squares to use in the dividers for the album.
You can repeat this process by creating additional templates to help with the divided pages if desired. Potential templates are:
- Vertical 2 x 3 - 4 x 6 template for a four vertical 2 x 3 photos
- Horizontal 2 x 4 - 4 x 6 template for three 2 x 4 horizontal photos
- Horizontal 4 x 3 - 6 x 4 template for two 4 x 3 horizontal photos
- Vertical 3 x 2 - 6 x 4 template for three 3 x 2 vertical photos
- 4 x 4 - 4 x 4 template for a 4 x 4 picture.
Haven't used My Digital Studio? You can download the free trial for 30 days here or you can purchase the software for only $19.99 as a download or as a cd. I use My Digital Studio for all my photo editing, printing, and design for photo cards, calendars, mini books and home décor. I will help you learn to use it so have no fear.
Have a craftastic day,
Stacy
No comments:
Post a Comment
Note: Only a member of this blog may post a comment.